Hi everyone. In this video, we’re going to cover the battle with the hyenas at the Pride Lands. We’re going to watch a cut scene before-hand and then the one after is pretty short, but we’ll do that, both ends leading into the hyenas and what happens directly afterwards.
[Cut scene start]
Simba: Oh!
Timon: Wait a minute. We’re going to fight your uncle for THIS?
Simba: Yes, Timon. This is my home.
*Scene shifts to sleeping lionesses at Pride Rock*
*Scar looks up to see Simba*
Scar: Simba! You’re…alive!
Simba: This kingdom doesn’t belong to you.
Naala: Simba’s the rightful king.
Simba: The choice is yours, Scar. Either step down or fight.
Scar: Must this all end in violence? I’d hate to be responsible for the death of a family member, Simba…
Simba: I’ve put the past behind me.
Scar: But what about your faithful subjects? Have they?
Naala: Simba, what’s he talking about?
Scar: Go on. Tell them who’s responsible for Mufasa’s death!
Simba: I am.
Scar: He admits it! Murderer! If it weren’t for you, Mufasa would still be alive. Do you deny it?
Simba: No! But it was an accident!
Scar: You’re in trouble again. But this time, Daddy isn’t here to save you. And now everyone knows why! Now this looks familiar. I think I’ve seen this before. Oh yes! I remember. This is just the way your father looked….before he died. And here’s my little secret…I killed Mufasa.
Simba: Murderer! Tell them the truth!
Scar: All right. All right! I did it.
Simba: Louder!
Scar: I…killed…Mufasa!
*Hyenas run into scene and push SImba off Scar*
Sora: Simba! You get Scar: We’ll handle these guys!
Timon: ‘Scuse me! Pardon me! Comin’ through!
*Hyenas, Timon, Pumba, Sora, Donald, and Goofy run into cave*
[Cut scene end]
A lot of that scene was based on the movie, in case you haven’t seen it. So, I’m going to make a quick cut because I take the time to go and save but before I do that, I’m going to let you know I think I’m at level 28 and the recommended level here is 26, so I am slightly over-leveled for this battle, in case it looks easier than whatever you may be dealing with if that’s why you’re here, watching the video.
Fight the hyenas while protecting Pumbaa and Timon!
Alright, so we have three hyenas that we are dealing with, and Timon and Pumbaa are moving around quite a bit, but sometimes you get a reaction command to call them over, in case you want them nearby while you’re trying to protect them. During most of this battle, I focused on being aggressive and attacking the hyenas. You want to take them out as soon as possible. And if I saw the opportunity to call Timon and Pumbaa over, I would, not to really attack the hyenas so much as just to have them nearby since the goal is to protect them. And we do pretty well here. So, it’s just whatever is hyena nearby, preferably the one with the lower health bar. Okay, I see we have one out, and even though it looks like we’re just fighting one, the other one must be attacking Timon and Pumbaa or something’ cause there, there, now we have both of them. So, but this one is almost out.
Alright, good. Now we have two down, last hyena to go. And we’re pretty close. And, there we have it, very straight-forward.
[Cut scene start]
*Hyenas run away*
Sora: Where’s Simba?
Naala: He went up there.
[Cut scene end]
I am going to make mention of the fact that the narrative in both the movie, The Lion King, and the Kingdom Hearts play-through for Pride Lands, that Naala is established as a strong lioness, and yet she is sidelined to basically just watch all of the guy characters do things, and she does not get to do much, except be there, and I really wish that she were given a more active role all-around.
So, that said, that’s pretty much the battle with the hyenas, and we will cover the battle with Scar in a separate video. Thanks for your time.
Transcription:
Hi everyone, welcome to my guide on the Oogie Boogie battle in Kingdom Hearts II: Final Mix. We’re going to watch the scene before, and I’m going to show the battle, and then we’ll see the short cut scene afterwards. Let’s get started.
[Cut scene start]
Oogie Boogie: *laughing, approaches and surprises Sally*
Sally: Oh!
Oogie Boogie: *seems to shove her out of the way* Jack Skellington!
Jack: Oogie!
Oogie: *laughs* You and I have a score to settle, Jack! Same goes for your little sidekicks.
Jack: What are you planning to do with Sandy Claws?
Oogie: Who? Sandy Claws? I don’t know what you’re talking about! And why is this roly-poly red guy here? Time to go, grandpa! *forces Santa Claus to stand while still tied up and starts laughing*
Sally: *throws her detached leg to distract Oogie*
Oogie: Eh?
Santa Claus: *escapes and goes to Sally’s direction while still tied up*
Sally: Mr. Santa Claus!
Oogie: *growls*
*Sora, Jack, Donald and Goofy stand in front of him*
Oogie: Why, you… *walks way and into glass box, laughs*
Donald: Stop! *walks into panel on center walkway, ends up on the left walkway* Huh? *goes back and arrives on center walkway* Not again?
[Cut scene ends]
Okay, so that little part there explains the conveyor belt system to us, we won’t need it just yet. We need to hit these presents over up to Oogie Boogie and try not get hit by the hand. I actually get hit by it quite a bit even though I’m trying not to. Anyway, keep hitting the presents over to Oogie, and if you’re not angled right, you could miss so be careful about that. Just continue onward, try not to get so far back that the spikes hit you. I didn’t have that problem that often. So, more presents to hit up towards him in the glass. Keep going. We’ll get there. Almost there, for at least dropping him down the first time-there we go.
So, have at it. Keep going, but you’re not going to do it in one go. At least I didn’t. And went ahead and took the opportunity to heal. And I think I am going to have to start switching soon. Now the belts are flashing with the blues and the pinks. He’s still in the center, so I’m going to stay on the center belt for now and trying to get to those presents. And I’m trying my best to ignore the enemies and hope that Donald and Goofy can handle them, so that I can focus on hitting those presents up towards him.
Now I see that he has moved to the left so now it’s time to try and get an opportunity to move. There we go. Alright, and back to hitting the presents up towards the glass control box. We are almost there. And it’s about here that it occurs to me that my drive is maxed out, so I could be in Valor Form. And so that’s what I’m getting ready to do very shortly. There we go. And then after I’m in Valor Form, I’m like, “Well, maybe I should not be in Valor Form because what if I need to heal and use magic?” But whatever, I was just going to hit him as much as I could first, and then I reverted since Valor Form isn’t going to do me a whole lotta good until he comes down again. And the drive would be used up by then.
So, off I go, move to the center and running around. Now there are lasers. I just run around the lasers. Oh, got hit. And more hitting presents back to Oogie, trying not to get hit by the spikes, trying to jump over the hand. I actually jumped over it that time and did not get hit by it. In fact, that might have been the first and only time that happened. So, more lasers, still trying to avoid them, actually hit presents up near them at that point. Oh, time to move left again, so off I go, got hit by the hand. Move Left.
Alright, still avoiding the lasers, still hitting presents up, getting hit by lasers. Present. There’s the hand again. Got hit by it again. And, hit those presents up. And oh, he moved again. I healed my team real quick before I head on over and now I have to try and move right while avoiding the hand and the enemies. And here we go. Alright, right conveyor belt, avoid the lasers, hit the presents, avoid lasers, hit presents, hit presents. Try not to be squashed by the hand. Oh okay, so that’s twice that I managed to not get hit by the hand.
Alright. Come on team! We’ve almost got him, I’m really, at this point, I’m really, really hoping that this is it because I don’t want to have to do this another time. And we did it! Alright, way to go team! Yay! So let’s see the scene afterwards.
[Cut scene starts]
*Oogie Boogie has bugs coming out one of his seams, he stops it, they start coming out on the other side*
*Donald squashes bug with his foot*
*Sora breathes sigh of relief*
[Cut scene ends]
Oh, yuck. Alright, well, that’s a wrap, so thank you for your time.
I have not played all Kingdom Hearts games so am not completely up-to-date on the story from that though I did look up some information while writing this post. This post will contain spoilers from previous Kingdom Hearts games.
Monsters Inc. Trailer
The Monsters Inc. trailer starts with a scene between Sora, with Donald and Goofy to each side, talking to Marluxia, the main antagonist from Kingdom Hearts Chain of Memories. I have conflicted feelings about this sight because Marluxia is supposed to be done with after Sora defeats him in Castle Oblivion. Then again, if Marluxia’s back, then maybe Larxene is too, and she was one of my favorites from a recently completed Chain of Memories play-through, being delightfully devious and alas, the only girl in the entirety of the Organization XIII cast up until 358/2 Days with the introduction of Xion. That makes two girls out of fourteen characters in just that one group.
In any case, the sight of Marluxia and his exchange with Sora indicate the Organization is still a significant antagonistic presence. Indeed, I have learned of True Organization XIII and will find out more on that if I ever get around to playing Dream Drop Distance. Sora, Donald, and Goofy do not remember Marluxia in particular, them still having forgotten all the events of Castle Oblivion to have their memories put back together by Naminé.
The trailer then moves onto scenes and characters from the likes of Toy Story and Monsters, Inc., followed by game-play footage of a Tangled world though no scenes to introduce Flynn and Rapunzel. Much of the footage shows movement with transforming keyblades and various interactions between characters. Of note is that in each of the three worlds, Sora is shown as being accompanied by Donald and Goofy, as usual, but rather than them being interchangeable with a given party member from the world, two characters from each world are shown in the lower right, indicating a five-character party rather than three. The pairs from each world are Woody and Buzz from Toy Story, Sully and Mike from Monsters, Inc., and Rapunzel and Flynn from Tangled. That makes Rapunzel one girl out of each of the three possible parties shown.
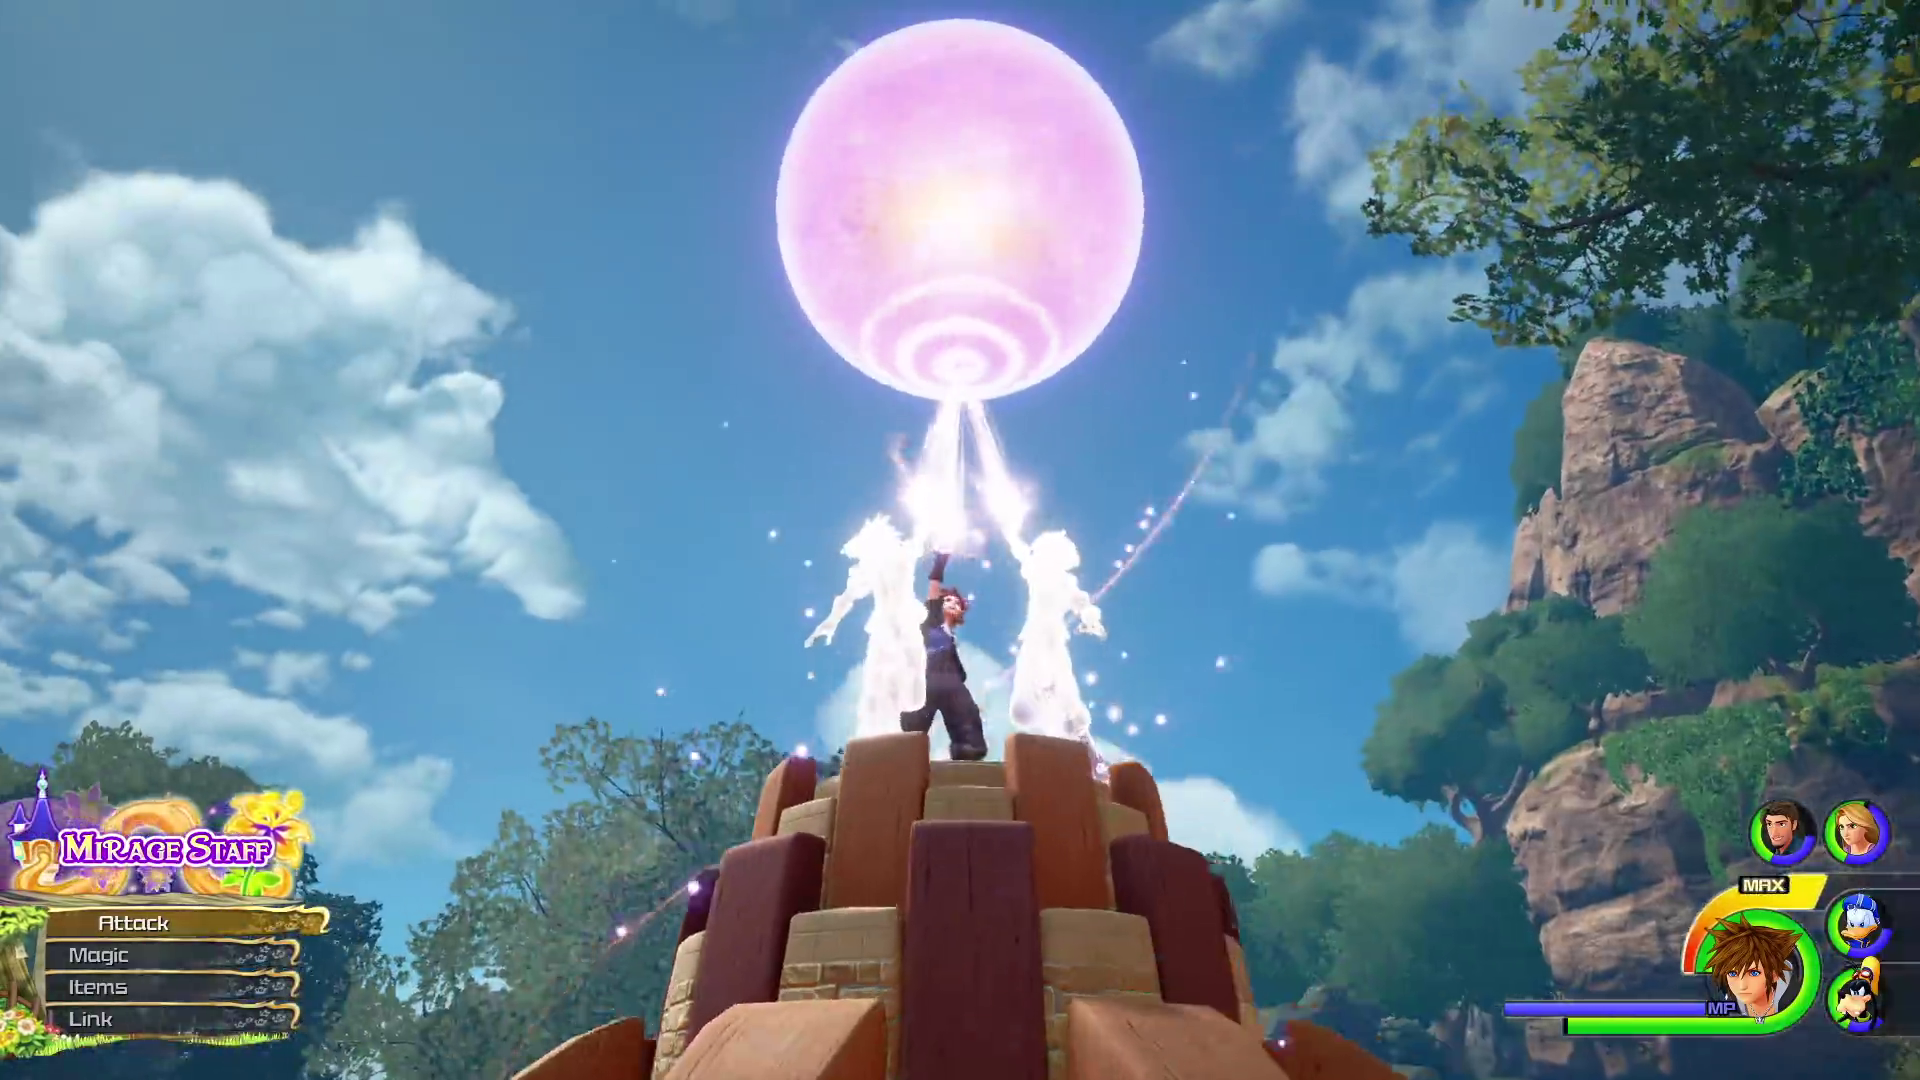
In the Tangled world, we do see a glimpse of, presumably, an Ariel summon. Ariel’s world is one Sora has visited in both Kingdom Hearts and Kingdom Hearts II. In Kingdom Hearts II, Sora had forms where his clothes would change and affected his abilities. Again, in the Tangled world, Sora’s clothes do appear to change color as he is doing something with special commands though the entire party still shows in the lower right of the screen. Instead of “Drive,” we see “Focus” as part of the gauges available to him.
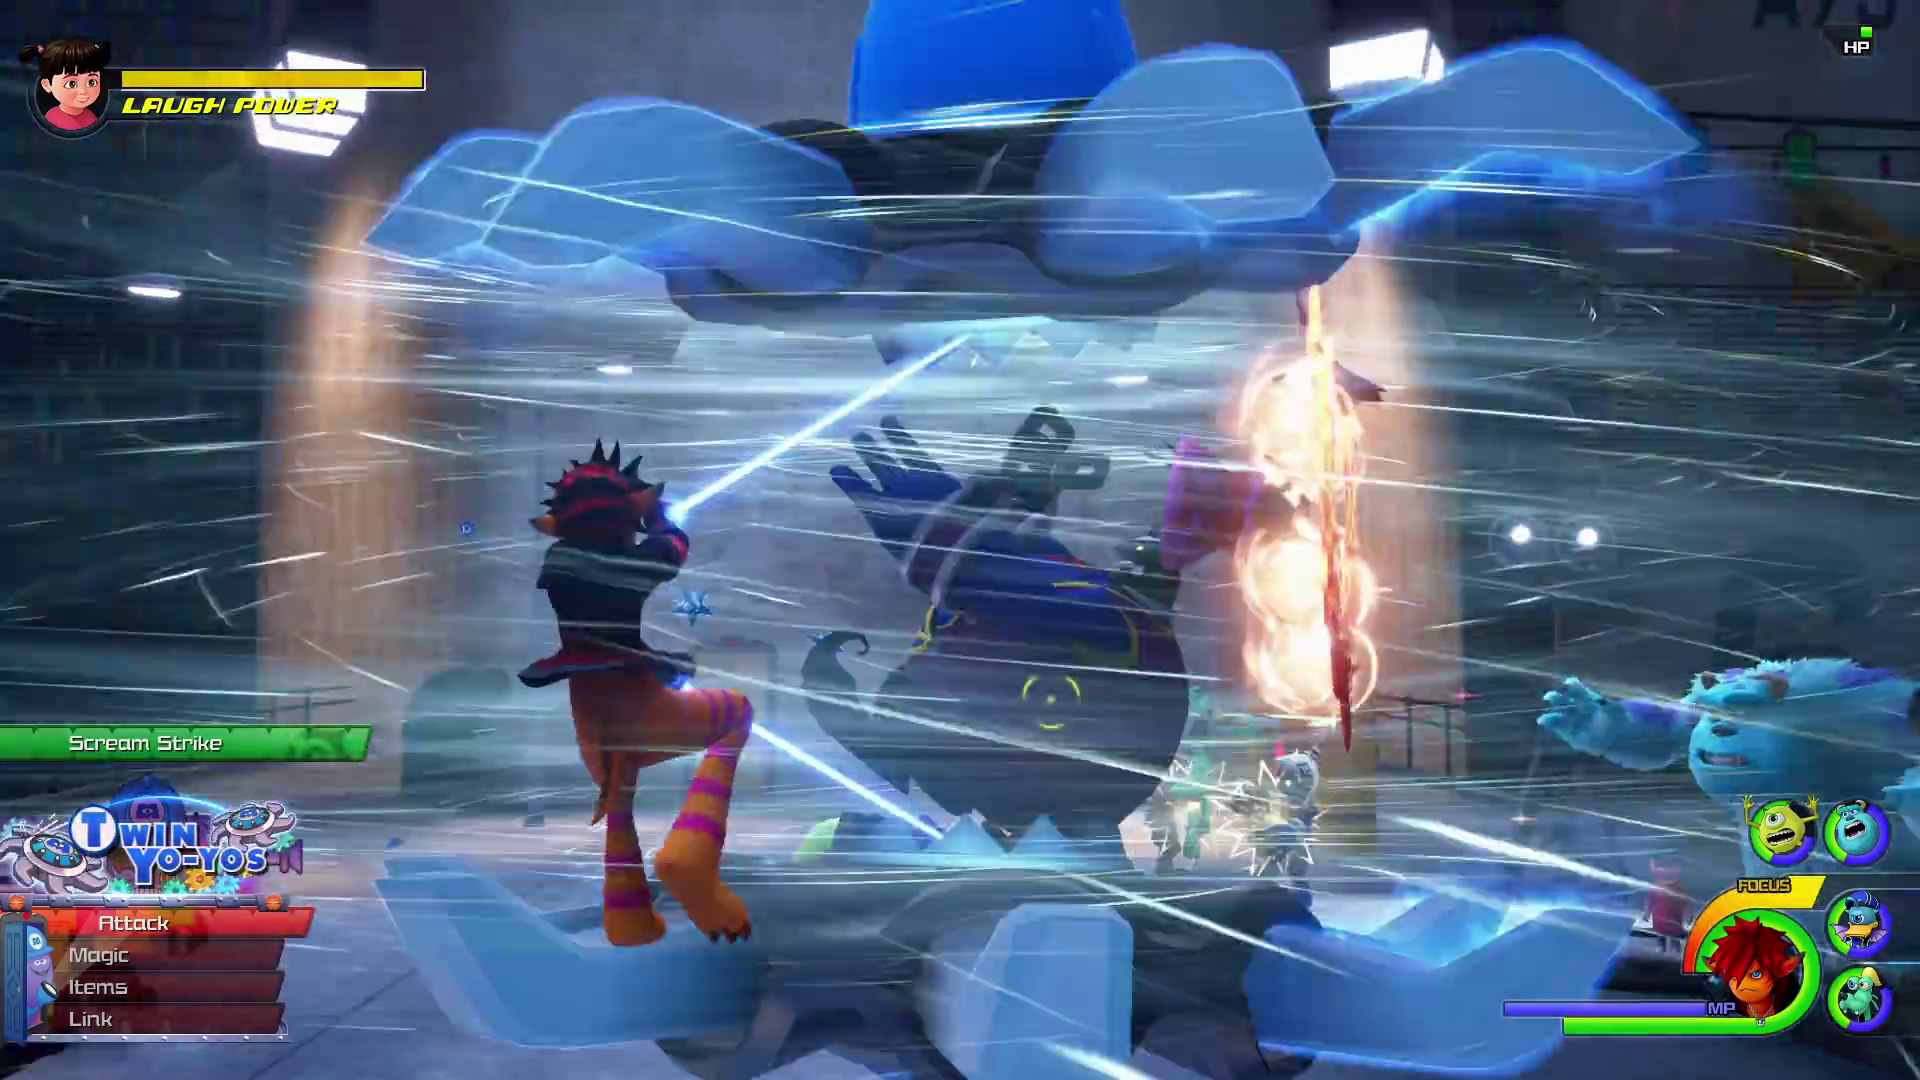
Each world shows a lot of interaction with the environment and affecting Sora’s available weaponry and attacks with Monsters, Inc. Part of the Monsters, Inc. footage includes a LAUGH POWER meter with a Boo icon in the upper left part of the screen.
As the trailer nears its conclusion, Sora is confronted by none other than Vanitas, with the Birth by Sleep antagonist saying he will take the half of him sleeping inside, addressing Ventus. Sora addresses him by name though acts surprised, indicating he doesn’t know why he knows Vanitas’ name.
Theme Song Trailer
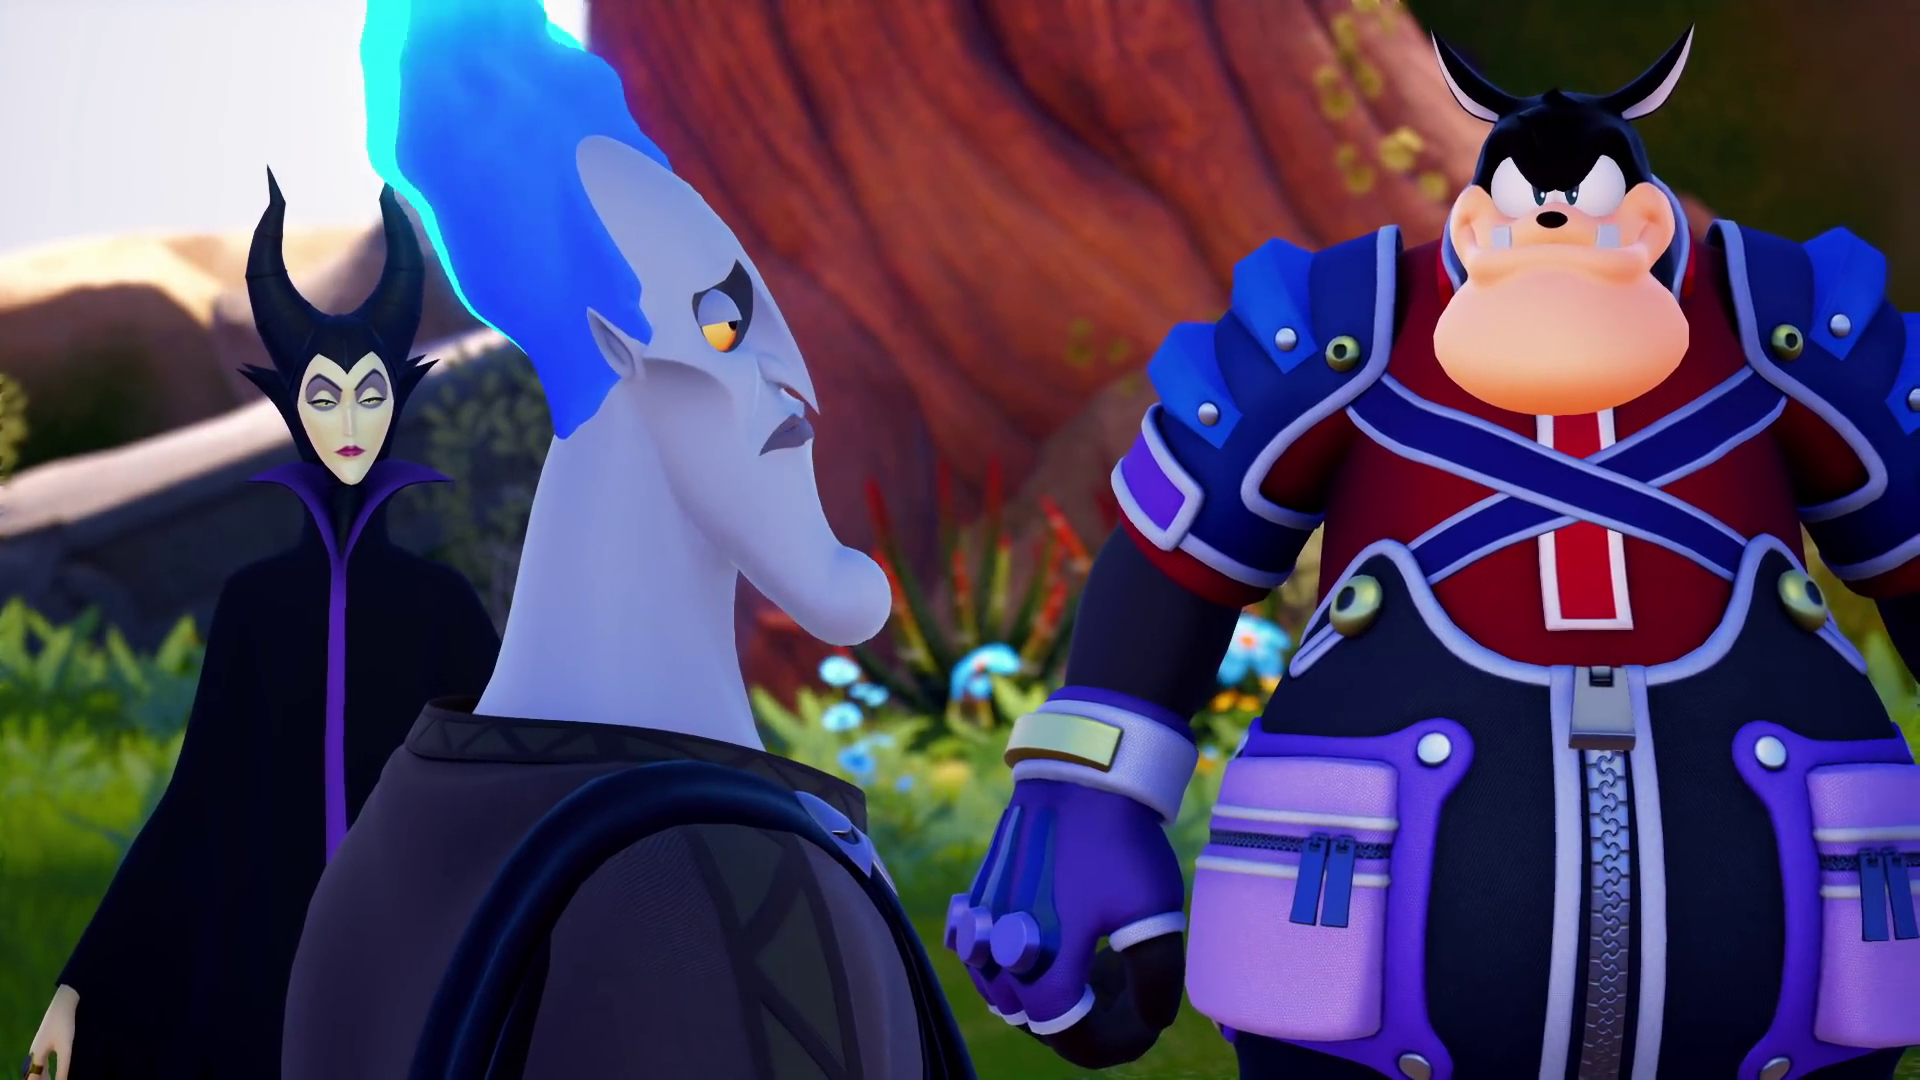
In addition to the Monsters, Inc. trailer was a trailer for the theme song, again done by Utada Hikaru. This time around, there is only dialogue at the end and so most of the video is visuals to the song. These visuals include a Young Xehanort, an introductory scene between Sora, Donald, and Goofy meeting Buzz and Woody, a scene of Vanitas addressing our heroes in the Monsters Inc. world, seeming to anger Mike in the process, and a glimpse of returning villains Maleficent, Pete, and Hades in probably the Tangled world. We also see Xemnas meeting Sora and another character next to him, who resembles Ansem from the first game (which is also the same appearance Riku has for most of Kingdom Hearts II). I assume this is more of True Organization XIII.
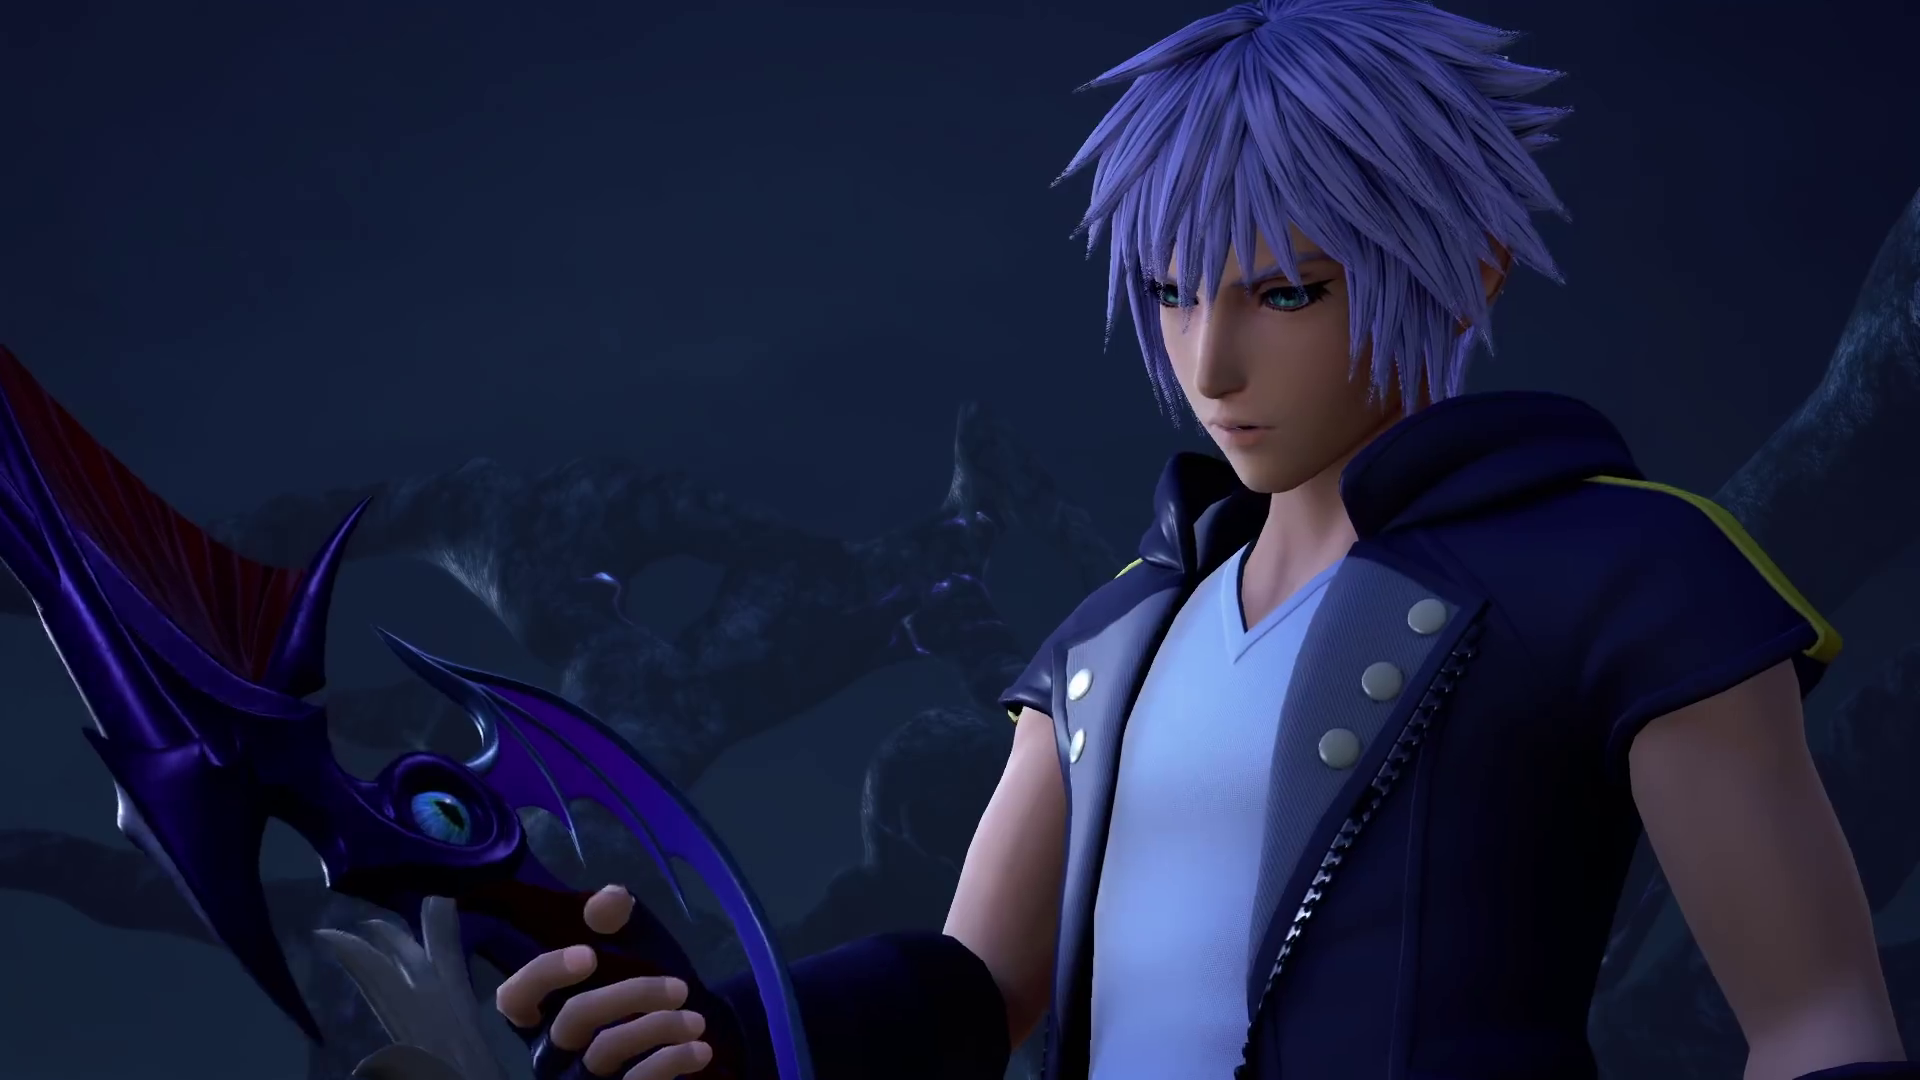
Speaking of Riku, the trailer concludes with a scene of Riku and Micky in the Dark Margin where Riku stares at a broken keyblade, notes he cannot use it anymore, and says he will leave it in this place in case the “other me” needs it. Micky looks surprised as he says, “Huh?” If he means his replica that disappeared in Chain of Memories or something else, we do not know yet.
Both trailers end with stating the game is “Coming 2018.” Familiar with long waits and delays from Square-Enix or other video game development companies, I can’t help remaining a little skeptical though I am happy to be wrong and see it release this year, especially since I am making 2018 my Kingdom Hearts Year, as I am going through the games in Kingdom Hearts I.5 + II.5 ReMix and might even follow that with Kingdom Hearts 2.8 Final Chapter Prologue. The timing will work out nicely at this rate.
Hi everyone, Cathy here. In this video, This video is going to cover taking on Sephiroth in Kingdom Hearts Final Mix through two methods. The first method I will show is the Strike Raid method. I saw it in a video by EliteWaffle on YouTube. And it did look very familiar, like maybe I’ve done that before myself. And then the other method was, I had a guide in mind. I looked one up by Soraalam1 “Boss Busters Sephiroth.” It was a very helpful video. And I tried to remember the general tips, but I also did a lot of the stuff that I usually do. Eventually, I felt like I could be more aggressive and just heal up and just be ready for a move called Descend Heartless Angel. If you don’t already know about it, it’s a move that Sephiroth has where he can knock your HP down to 1 and if you are hit by it, you pretty much need to have an Elixir ready to heal you before he hits you again.
So, when you’re prepared for that and you’re leveled up like I am, maybe not quite this high, but you’re leveled up, you can take him on I think. Here I am, I’m at level 100, I’ve got great equipment, and I’ve got lots of HP and lots of MP so, ’cause I saved battles like this one for close to the end. So, we’re going to wrap it up here and then I included his little intro movie because I like it so much. He’s one of my favorite characters and let’s go check it out very, very soon. Here we go. Here we go, gonna pick it. You know the rules, right? Question mark.
That was so cool. I lost on my first attempt, but that beautiful movie, so I made sure that I had at least the clip saved so that I could put it in this video because I like it so much. It’s actually on my old YouTube channel, just by itself. So, as you can see, if you’re watching the video, that we are really just doing Strike Raid over and over, locking on, and Strike Raid. And I’ve got lots of HP, lots of MP, and I didn’t show my equipment, but I have very, very strong equipment because I synthesized all the items, and I’ve equipped mostly things that increase my strength and/or MP and/or HP. So, here we go. You also want to be stocked up on Elixirs for when you do run out of MP. Alright, oh, now he’s starting to teleport around so according to the Soraalam1 guide, we have entered stage 2, and you can see he did Descend Heartless Angel right away, and I got my Elixir. And that move is pretty much why I had to try repeatedly at this fight. I even failed on the Strike Raid attempt, even the easy way. If you do not get your Elixir ready in time, it’s over! So, but you know, if you’re Strike Raiding fast enough, you will get him. And if you’re nearby and you hit him, you will get him. So, that was good, I did get him a couple of times before he actually pulled it off. I think that’s, I think for the Strike Raid version, I think that was really the only time he pulled off Descend Heartless Angel, but I’m not 100% sure.
So, oh he’s swiping at me, he’s swiping at me! You’ll see in the next one, you can guard a lot of those if you try. Alright, here we go, okay, I did get hit by that one. So that’s two. That’s two Descend Heartless Angels he’s done on me. And you can see both times, I made sure I got my Elixir in time. Alright, he’s starting to run around. He’s starting to run around. Oh okay, I was wrong, and there’s three. There’s three, so yeah, I guess I just let him do it over and over again.
Let him do his fire. Here we go. Oh, there he goes again, but we’re just going to keep doing Strike Raid. We’re just going to keep doing Strike Raid. Teleporting again. Ah! Yes! Yes! I got him. I got him in time. Did you see that? I got him before he did Descend Heartless Angel on me. Teleporting. Ah, the fire, but I’m fine, I’m fine because I’m Strike Raiding. I’m Strike Raiding. So, what’s he going to do, right? He’s going to-well, that. He’s going to do that, but I’m going to get him. I’m going to get him, I’ve just to keep trying. Well, as you can see there, I pretty much just took the hits and then healed right up. Haha, that did nothing because I am Strike Raiding him.
We are down to grass green. We are going to get him. He’s going to keep trying to get us, but we’re going to keep getting him. There goes our Strike Raid. Thank you Strike Raid. Almost got him and in the other method, this is about where I pull out the Strike Raid as well. Last health bar. We are so going to get him. We’re a little low on MP, but that’s okay. Do you know why? Because we have Elixirs for just such an occasion. Going to finish him off. Boom! Got him! We got him! And then we’re going to get an Ansem’s Report and probably a keyblade and probably a trophy too. Oh, there he goes, floating up in the air, looking all cool like Sephiroth. Okay, I will give you something. I will give you something for using Strike Raid on me over and over and over again. There you go, obtained One-Winged Angel, Ansem’s Report 12. Alright, my little victory pose. And if I did get a trophy, I cut it off right then because this is the next method over here.
Alright! So this time, we are going to save Strike Raid for later. Here we go. Here he comes, dodging, dodging right away. Lock on, got hit already. You’re going to see a lot of that actually. We’re going to start to hit, one hit, and then he hits me right back. So, and it takes awhile, and there’s the fire. And I have Sliding Dash equipped, thanks to the Soraalam1 guide. And I know that if you are close enough, you can try and close in once the fire starts to subside. There I am healing. So you see, I get caught in it a lot, but I’ve got a lot of HP. I’ve got my healing magic, and I’m not wasting my MP on Strike Raid, so I can heal quite a bit. So, he’s following me around. We haven’t even made a dent in his health bar yet or because his health bar is over the limit, I actually can’t see how much of a dent I have made on him yet. So, I’m just going to keep going, keep dodging while he does the little leap forward, trying stay out of-oh, didn’t stay out of his range and almost got caught in the fire but then zoom in and do a little combo there.
And we’re going to basically repeat that over and over and over again. So it’s still kind of a repeated action, it’s just, it’s not Strike Raid. It’s a three-hit combo if we can get one and a lot of evasive action. Running. There’s a swipe. Okay, near the fire. Oh, I got hit by it, but I was trying to wait for it to subside and get in there without getting hit by it. You see that I tried to glide over to him, but he was too fast for me. We have finally cut into the health bar. Yay! So yes, yes, I am damaging him, even if slowly. There’s the fire again. Gliding, not in time. Running. Dodging. Dodge Roll. An aerial attack. He got me, oh caught right in the fire. Oh, oh that hurt. That hurt. But hey, I got a combo. Now I’ll heal. And I got hit again by the fire. That just keeps happening.
Alright, and he does his little leap there. Running. Running, running! And there’s the fire. Get in! No! Too soon, too soon. Too soon on the hit. Heal again. That’s just happening over and over again. And at some point, I’m like, you know, I’m running and getting hit, so I may as well just be more aggressive and go after him. ‘Cause yeah, getting hit, still having to heal, even when I’m trying to run away as much as I am. Running again. Dodging. Dodge roll, dodge roll, just out of reach. There’s the fire. Slide Dash! Still not close enough, oh, oh, there! There. Now he’s started to teleport, so that means he will attempt Descend Heartless Angel soon. Probably. I mean, I guess, he attempted it very quickly on that Strike Raid version that we did. So let’s see what happens. I’m Dodge Rolling. And there he is. There’s the fire again. Got hit by the fire again. Slide Dash, miss, or rather, we both clashed there and then I could do my combo. Ah, not that time though. Heal! Alright. He leapt. Oh, right smack dab in the fire. Yeah, he still hasn’t done Descend Heartless Angel yet. I’ll be ready when he does though.
And there it is. So, and you see, he’s doing it, got it, just in time. Like so close, he almost had me there. He almost had me. There, yeah, I got a combo. Yes! Ah, stopped and in the fire. Stuck in the fire. He’s running now. He’s running around the stage now while he’s still going after me. So, now, he’s being more aggressive, which I guess means in a sense, I can be more aggressive because he will be near me more.
Okay, here we go. Start blocking. Oh okay, I’m not blocking here, but there I go. Block, block, block. So it actually looked like at least three hits there. Oh, there he does his thing again. So, got my Elixir ready and now! Still just in time. Here he is, running, leaping, teleporting, He likes to teleport. And I like to get my hits in. Oh, there’s the fire. Heal. Nice, powerful healing magic thanks to all my wonderful MP there, thanks to my synthesized weapons and accessories, weapon and accessories. Jump! Combo! Yeah! Yeah! Oh, and then I’m stuck in the fire. Heal! And we’re going to keep doing that. Uh-oh! Here it comes again! Alright, time to block. Block. Block, oh, not there. Block, block. Augh! Well, got some blocks in. So that’s still good. More combo. Another combo.
Alright, so now I’m being a lot more aggressive myself because he is being a lot more aggressive, and he’s just coming after me, so I’m like, “Alright, fine! Fine. I will just come right at you and heal a bunch.” Like usual. Yup. I’m sure I’m going to heal soon because I’m pretty low on health. There we go, right there, right in the middle of the fire. Make sure you have Leaf Bracer on. If you don’t have that ability, maybe you should wait to get it ’cause it’s a big help during this battle. Alright, so he’s going to send those things after me. And I’m going to run around going “Aah aah, okay, can’t block that.” Can’t block that. I’m trying to be like, “Should I glide? Am I supposed to glide? I don’t remember.” *laughs* And there he throws the thing. I got hit, but it wasn’t that bad. Oh hey, hey, I see some grass green life bar there.
Alright, and he was twirling at me, there he goes, does a little twirl slash there. So, alright, alright, yeah, I’ll hit you back. I’ll hit you back. There he’s teleporting again. Okay, heal! Okay, yeah, we’re doing good. We’re doing good. We can bring out the Strike Raid soon. We can bring out the Strike Raid soon. Alright, I’m getting more combos in now that I’m getting closer, and he’s staying closer. And I’m like, “yeah, bring it!” Do the Strike Raid. Do the Strike Raid! And, there he is! Almost got him. Yeah! Yes! Yes! We have done it, with Strike Raid and other stuff this time. Way to go. We did it! Yay! And that’s it. The End.
Hi everyone, Cathy here. This video is going to show you how I defeated the Phantom on my play-through in Kingdom Hearts Final Mix for the PlayStation 4. I am going to share with you the strategies that I looked up and used, the main one being the Phantom FAQ provided by GameFAQs by Wirewyrm. I also watched a video by Missiledine Online and another by Soralaam1. So, I’m going to go ahead and explain a few things to you and then show my preparations for it. The Phantom Heartless is a heartless at the clock tower and you need to have Peter Pan in your party because Tinkerbell will be the one to take you there. And the Phantom casts Doom on Peter Pan first. Then if the Doom finishes, he will die and the Phantom will cast Doom on the next party member, be it Goofy or Donald who is with you. And then if that party member dies, the Doom will be cast on Sora. So it’s a kind of scary, pressured situation if you are not prepared for it.
Here are my shortcuts that I am going to use. In case you missed them because that was a pretty quick look: triangle for Aeroga, square for Stopra, and X for Cura. I could have had Curaga at this point, but I forgot to talk to Aerith a couple of times more in Hollow Bastion at the library. I did talk to her like another one or two times, but she didn’t give it to me until I talked to her still even more.
Oh, here I am stocking up on Ethers for Goofy and Peter Pan. At this point, I had already given Sora several Mega-Ethers and two Megalixirs. So, here I am running through and giving Ethers to both of the other party members.
To go back to the Phantom explanation, the Phantom can only be hurt based off of the glowing heart at the bottom of its cloak: white for physical attack magic-I mean, I’m sorry, white for physical attacks, and then the red means fire, blue means ice, yellow means thunder. And so my teammates, their only going to be good for giving Sora MP for the magic-casting or doing the physical attacks. And you can press triangle to tell them to attack the Phantom, so I made a habit of doing that when I would see the white heart at the bottom.
Alright, we are almost done stocking up on Ethers here. And then I’m going to double-check the abilities and remove any from Peter that uses MP because I do not want him giving Ethers to himself. I only want him giving Ethers to Sora. And then I will, in a moment, double-check on Goofy, but Goofy is already setup to have MP Gift. If you do nothing else from any of the strategies that you hear or read on this boss, give Goofy MP Gift. And I already have him removed on the abilities that cost MP. I don’t think he can even do them because we are flying, but I can’t say that with 100% certainty and may as well be safe.
Alright, so Peter is in my party, more saving, I save a lot, like all the time and then I’m going to remember to also change his equipment. Sora and Goofy already have very strong equipment that mostly boosts their MP because we want strong, strong magic for this fight. Alright, so then for Peter since I don’t want him casting magic and he’s not, he doesn’t have an MP Gift, I want him to be very strong, as strong as he can be, so I will loan him my Titan Chain and my Golem Chain. So, Titan Chain and then Golem Chain. And this is me just double-checking that those are the strongest ones that I have, which they are.
More saving.
Okay, now we are finally ready, I think, to talk to Tinkerbell.
And here we go.
Now I’ve already explained most of this and the preparations involved, so most of what you’re going to hear from me now is just what’s happening on the screen. So, here’s the Phantom.
And it is going to cast Doom very, very soon, not quite yet, I want to make sure I wait ’cause I think when I have done this in the past, I have done the Stop a moment too soon. So, there, I’m going to make sure the number’s over Peter’s head before I do it. And here I go.
I am not used to casting magic, so you’ll notice I’m a little slow on the casting, and I have trouble aiming, but I manage to pull it off all the same with all the preparations done for this fight. You do not have to be this high-level to do this fight, it just makes it a lot easier, especially with the preparations. And I wanted it to be easier. Now the Phantom hits really hard, even with as strong as my characters are at this point, which is one of the reasons I keep my cure on, so that, that way I can cure very quickly when I will need to. And here I’m pretty quick about putting that Stop on because I, I have had my teammates die on me when I’ve done this battle before.
Alright and when there’s no heart there, you can’t hurt the Phantom, so you can use it take a moment to re-stop the clock, to cast wind in case that, that attack that you might have seen right there, the Wirewyrm guide calls it a Heat-Seeking Worm. The Phantom will arch its back a little bit and put the hands near the hood and maybe kind of groan or howl, and they hurt you very hard, very harsh, very hard hit, so casting Aeroga will make them bounce right off. The Wirewrym guide suggests finding a safe place to hide, even provides a map. So if you want to do it that way, you can. Myself and several other people find it easier to just cast Aeroga. Like that. Thankfully because of the visual cue, it helps a lot with making sure you have enough time to do that kind of magic.
Alright and here we are, attacking it as best we can. I’m telling my teammates to attack when I remember to. Also when there is no heart down there, if you’re not stopping the clock or casting Aeroga, you can also use that moment to pop in an Ether or a Mega-Ether or a Megalixir, whatever items you have given yourself to help with this battle.
Go and stop the clock.
When I have played Kingdom Hearts and before, even though you could switch targets, I would usually just use R1 to lock onto one and then off and then find the next best thing, but you can also switch between targets using L2, and I went to the trouble of making sure I knew that during my play-through and so that was very very helpful during this battle, so if you don’t already know how to switch targets, I would suggest familiarizing yourself and learning how to do it. Regularly.
Megalixir time. I think it was the first one that I used. I have two. Now if you’re wondering why I have the sound off, it is because when I have made videos about games before on YouTube, I have other companies claiming copyright ownership of the music, companies that I don’t think have ownership of the music, but then, neither do I. So even though I might be able to say, “Hey this video is okay by fair use,” I honestly don’t want to. I’ve had some unfortunate experiences with YouTube that go even beyond that.
So, here we go. Pop that right off. And then, oh we are in grass green now, for the health bar, so that’s nice, which means that at this point I think I’m feeling pretty good about my team’s chances, especially with Peter still having a 12 over his head. I definitely like that number being as high as it is.
I think when I have done this battle in the past, I have waited for the Stop to wear it off because I don’t know how long it lasts, but because I’m so high-level here, and I have so much MP, even as precious as it is, I felt good about being able to Stop as often as I did. So I did. You see right there, my MP was getting pretty low, but Goofy gave me some, so I’m still alright.
Thunder. Stop the clock. Attack! Wrong magic. Fire! There we go. A little low on health. I don’t remember if I heal since I’m so close to doing it. Yeah, I think I do. Next Megalixir. Here we go. Alright, and now we’re going to attack again. Thunder. Attack. Deep freeze. Stop the clock. So close. So, so close to being done. Almost there. Alright. Very, very close. Here we go. Yeah! We did it. Alright. So then for our trouble, we will see a short movie of the Phantom. We’re back. We’re going to see the heart come out. And then we will be rewarded with Stopga because I already have Stopra. And that’s it.
Hi everyone, Cathy here. I am going to share with you my strategy for taking out the Sniper Wild Heartless in Kingdom Hearts Final Mix. I used a lot of guides because I had trouble with this Heartless and I’m going to tell you right now, this video is slightly different than my usual strategy, but it is the one that I took the trouble to save, so here we are.
So, first thing, we take out the first Heartless. We just sneak up on her and take her out. Ideally, what we would have done is waited for her to get in a position closer to where the next two spawn. The way it works is one Sniper Wild, take her out, two more spawn, take those two out, another three spawn, and then it repeats. So, you want to take out six Sniper Wilds to get one Power Stone, if you’re lucky. So, ideally, after the first one’s out, I would put myself between the next two and cast Stop. If you’re watching this video, you can see that did not happen. But that would have been ideal because it would have been faster, but this still wasn’t so bad.
I actually got kinda lucky here because as you can see, I try and go up to that one, and I don’t see her. And, oh, I guess that’s when she jumped down. She jumps down and thankfully she just missed me. The Sniper Wilds, if they see you, and they call for backup, they will start sniping at you and calling and more Sniper Wilds will spawn. And that will happen endlessly. You can’t take them out, I mean, you can try and take them out, but there’s no point because they won’t stop spawning. So you have to make sure that if they see you, they don’t call for backup. ‘Cause in this video, I think almost all of them actually do see me, but I take them out before they finish like “Aah!” sounding the alarm. I take a moment to breathe. *deep breath*
Alright, so this post with the light by the stairs, is my preferred spot. The camera can be a bit of a pain, but it makes for a kind of nice hiding spot and a little easier to figure out and strategize where to go next, to find the next one. Is she staying over there like this one is? She was not moving so fine, I’ll go up to her. I prefer not to do that because you see, I’m completely across from where I want to be. It’s easier if they happen to come by the stairs, but that can also take a very long time. So, you just kinda have to go with what feels best at the time. And here I can see that one of them went to my preferred spot by the stairs, so I waited a bit before heading over there, trying to be careful and hoping they don’t see me.
There’s going to be a bit of waiting involved here, so I will also tell you some of the strategies that I read or watched on YouTube. One of them involved, I think it was stopping the first one and then using Dumbo. A lot of the strategies involve using Stop because you want to get to them before they sound the alarm. So, use Dumbo, another one, Stop, use Mushu. Actually, I don’t think that one involved Stop. I think it was just Mushu and make sure you take them out fast enough.
Alright, so here’s the first of the last three. As you can see, she spotted me, but I got her. Yeah, I think all three of them spot me, but like I said, take them out before they call for backup, and we’re good. The main strategy that I remember reading involved like a lot of Stop. I don’t remember if you had to stop the first one or not, but ideally, you would stop the first one, stop the next two, stop the last three. For the last three, it’s probably better if you have Stopga. I don’t know if it’s necessary. And I didn’t bother to find out or re-look it up because Stopga involves the Phantom. I was going to take out the Phantom last. I wasn’t going to involve myself with that.
Alright, so we’re on our last one here, and in this video, this is the only time I cast Stop. But in most of my efforts, I would have cast Stop when the set of two spawn. So, here, I leave right away because this whole thing makes me really nervous. But if you don’t get as nervous as I do, by all means, go for it again. And that’s it. The End.
If you appreciate any of the work that went into making this post, please consider giving a tip to my PayPal account or supporting me on Patreon.