How to Use the Elementor and Simple Lightbox WordPress Plugins to Create a Tumblr-Like Photoset or Masonry Gallery

I wanted to make a WordPress post that showed a drawing’s progression log like I have done in the past on my Tumblr. For Tumblr, the web application interface lets you re-arrange the images in size and order and makes the photoset a slideshow. You can also put captions in that will appear under the photos in the slideshow, and that slideshow lets you navigate using the right and left arrow keys. This is not specific to only Tumblr but uses the Javascript library, Lightbox, which I have little experience with. However, I do have plenty of experience making Tumblr photosets.

This post will break down the steps I took to accomplish that goal should I need to find it again or if any readers find the information useful. Before I start, I will say that Tumblr Photoset Grid/Masonry Gallery for WordPress by sike is a $12 plugin I found that, by its description at least, would have done exactly what I wanted. Most of the information you would need for what I ended up doing instead are in this video, How to create masonry style gallery in Elementor Page Builder for WordPress.

As I made this post, I noticed the Simple Lightbox alone would also work for my main goal of a series of images in a single column and through regular WordPress posts, without Elementor so long as the images link to the media file. Still, this information is useful for if I ever want to do more columns in masonry gallery format.

1. Use the Elementor Plugin

Install and activate the Elementor plugin if you are not already using it in your WordPress site. Elementor alone can let you put in an image gallery that can be a single column and act as a slideshow, but I ran into an issue where the captions would not show, not even on the actual post as described that it should in the documentation. For some users, showing the captions below the images within the gallery is actually unwanted. In any case, I wanted to put text somewhere, it didn’t have to be image captions per se though it was preferable at first, and Elementor alone was not going to be enough.

2. Update the Elementor Plugin’s Global Setting to Turn Lightbox OFF.

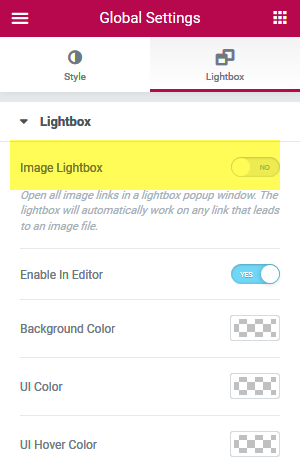
To prevent double opening of a lightbox, we are turning off the Lightbox setting, which is on by default, in Elementor.

3. Use the Simple Lightbox Plugin

Install and activate the Simple Lightbox plugin. If you need to update any of the settings, you can do so through the Plugins page or under Appearance from the WordPress dashboard, then choosing Lightbox.

4. Create Post Using Elementor

For the type of post I was trying to do this for, I created a single-column post where I show a starting progression at the top and finished image at the bottom. You can do the actual columns and sizes however you want, that is the benefit of this masonry gallery approach. The next step is the really key one.

5. Create Image Widgets and Link Each One to Media File

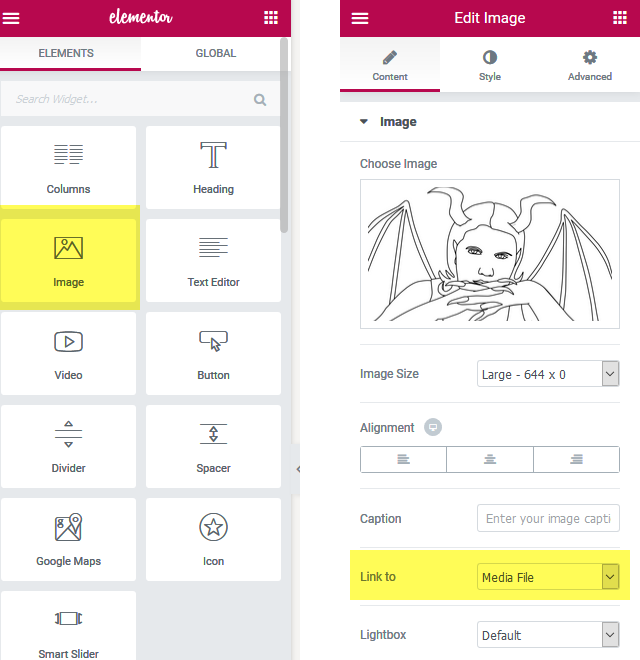
Because we are using individual image widgets instead of an overall image gallery, we have more freedom with the content between the images so instead of putting the captions with the image properties and showing in the Lightbox, I’m actually placing them above each image as I explain my process. With our Elementor plugin already set to have Lightbox OFF by default, we can now leave it to the Simple Lightbox plugin to create the slideshow and group the images together automatically. Preview or update the page too see the Lightbox single-column in action.

6. Adjust CSS

This step can be skipped if you are happy with the Simple Lightbox default look. I updated some of the CSS to my own preference because of past familiarity with Tumblr photosets.

The following was added through Appearance, Additional CSS:

/* Removes 16px border made through padding within this container */
#slb_viewer_wrap .slb_theme_slb_baseline .slb_container { 
     padding: 0 !important; 
}
/* Changes box shadow to black and new radius, more closely matches a Tumblr photoset */
#slb_viewer_wrap .slb_theme_slb_default .slb_container {
     border-radius: 3px !important;
     box-shadow: 0 4px 30px #000 !important;
}

Within the post I was working on, I also hid the details in case I end up using captions more often in the future and the post being worked on turned out to be an exception rather than a rule for how I want the text describing images to look.

<style>
.slb_details { display: none;}
</style>

DONE!

You can see the final results of my efforts in my Chaos with Claws Progression Log.

Further Notes

Another option I considered was to have a slideshow at the top and then show the progression log as individual images below it. I also tried out a plugin called Smart Slider 3 that looked really good for slideshows in general but then realized I still wanted my single column of each image in the set to be visible on the page. I even thought of having 7 different slideshows and putting them all on the same page but that was too much work for something that could be done better another way.

If you appreciate any of the work that went into making this post, please consider giving a tip to my PayPal account or supporting me on Patreon.

How to Use jQuery UI Sliders and ColdFusion for Scaled Questions

This tutorial will assume that you know what jQuery and jQuery UI are and you know how to get them. We will be using a little bit of ColdFusion as well, so if necessary, apply any other programming language to query, loop, and output data. By scaled questions, I mean, “On a scale of 1 to 5, how much do you agree with the following?” The scale numbers can change, but that is my meaning. My current work in mystery shop and online survey questionnaires involves a lot of these.

Here is the function we will be working with:

<script>
var fnCreateSlider = function(idQuestion,iSliderAnswer,iMin,iMax,steps) {
	var handle = $("#handle-value-" + idQuestion + "");
	var SliderTextObj = $("#slider-text-" + idQuestion + "");
	var SliderValueObj = $("#slider-value-" + idQuestion + "");

	$("#slider-" + idQuestion + "").slider({

		value: SliderAnswer,
		min: iMin,
		max: iMax,
		range: "min",
		create: function() {
			var iSliderVal = $(this).slider("value"); 				
			handle.text(iSliderVal);
			SliderTextObj.text(steps[iSliderVal]);
			SliderValueObj.val(iSliderVal);
		},
		slide: function(event, ui) {
			handle.text(ui.value);
			SliderTextObj.text(steps[ui.value]);
			SliderValueObj.val(ui.value);
		}
	});
}
</script>

We will have multiple questions so that is why we have question ID numbers being passed. The iSliderAnswer will tell us where already existing answers will go. The iMin and iMax variables help us track minimum and maximum variables. As for steps, let’s go over that now.

The scale is not going to be only numbers of, for example, 1 through 5. Each response has actual text to represent what it means, such as:
1 – Strongly Disagree
2 – Disagree
3 – Neither Agree nor Disagree
4 – Agree
5 – Strongly Agree

The “steps” variable is an array of our text responses that will be displayed for each value on the scale. We need to both get and pass that information.

So, on some place before or after the script, here’s our query.

<cfquery name=” qryResp” datasource=”master”>
Select iNumber, vcRespValue, vcRespText, fDisplayOrder
From tblResponse
Where idQuestion = <cfqueryPARAM value="#qryQuestions.idQuestion#" cfsqltype="CF_SQL_INTEGER">
Order by fDisplayOrder
</cfquery>

We still have a lot to take care of before we actually call the fnCreateSlider function.

Query to see if a matching answer already exists. Users page through our questionnaires and have the ability to go back if necessary. Handle that process elsewhere according to the needs of your project and/or application.

<cfquery name=”qryRespMatch” datasource=”master”>
Select iNumber, vcRespValue, vcRespText, fDisplayOrder
From tblResponse
Where idQuestion = <cfqueryPARAM value="#qryQuestions.idQuestion#" cfsqltype="CF_SQL_INTEGER">
and vcRespValue = <cfqueryPARAM value="#PrevAnswer#" cfsqltype="CF_SQL_VARCHAR">
order by fDisplayOrder
</cfquery>

Let’s initialize some parameters for our minimum and maximum.

<cfset iSliderMin = 1>
<cfset iSliderMax = 1>

Now let’s get the real minimum and maximum

<cfloop query="qryResp">
	
<cfif qryResp.iNumber lt iSliderMin >
	<cfset iSliderMin = qryResp.iChoiceNumber>
</cfif>
	
<cfif qryResp.iNumber gt iSliderMax>
	<cfset iSliderMax = qryResp.iChoiceNumber>
</cfif>	
	
</cfloop>

Due to the nature of a slider, we don’t really have a null or blank value. That can be a problem for recognizing an unanswered question. If the default value is 1, which is currently “Strongly Disagree” we want to make sure it is because the user wanted it to be 1 as their answer, not because they forgot or tried to skip a required question.

With no blank option, we can put whatever number we want that isn’t on the real scale we are measuring as the default answer. So my approach to that was to drop the real minimum by 1.

<cfset iSliderMin = iSliderMin – 1>

This tutorial is focused on showing you how to get the sliders to display and work though I felt acknowledging a lack of blank answer important enough to note since I didn’t see it mentioned in my searches for how to handle for it. You can use my post on Passing Form Data from a jQuery Ajax Call to a CFC Function and Returning It to learn about passing form data., which is extremely useful for validating it client-side and before the form is submitted and data saved. In the CFC itself, you’d look up the questions minimum/maximum options, see if the chosen value is between them and if not, send back a message to the user saying they have to pick between x and y (1 and 5 in our case). I have the numbers show on the actual slider itself to make it clear what the user is selecting. Enough about validation, let’s move on.

Our query for responses is actually happening within a query outputting question data. It looks something like this:

<cfquery name="qryQuestions" datasource="master">
Select idQuestion, vcQuestionText, vcFieldName
From tblQuestion
</cfquery>

<cfoutput>
<cfloop query="qryQuestions">
	[response queries are in here]
	[slider div displays in here too]
</cfloop>
</cfoutput>

We have two divs, one for displaying the response text and the other for the actual slider. Additionally, we will have a hidden input value to store the response being entered, which will be useful for tracking previous answers and for validating the value. Here is the HTML and ColdFusion for that:

<div id="slider-text-#qryQuestions.idQuestion#" class="slider-text">
	<cfif qryResp.recordcount>
		#qryResp.vcChoiceText#
	<cfelse>
		No answer
	</cfif>										
</div>

<div id="slider-#qryQuestions.idQuestion #" class="div-slider">
	<div id="handle-value-#qryQuestions.idQuestion #" class="ui-slider-handle"></div>
</div>

<input type="hidden" id="slider-value-#qryQuestions.idQuestion#" name="#qryQuestions.vcFieldName#" value=”#PrevAnswer#”>

<cfset iSliderAnswer = PrevAnswer>

At long last, we create our steps array and call our function. I put “No answer” as the first text response on the scale, as noted earlier to be a value that is not the real scale being measured. Again, I want to make sure our users have to pick something between 1 and 5. In this particular example, the questions always start at 1, so our replacement for a blank answer will be 0. I’m not hard-coding them because in my experience, sometimes the scale starts at 0 instead of 1, and I want it to be available for the day when it starts at some other number too.

<script>
$(function() {
	var steps = [
		"No answer",
		<cfloop query="qryResp">
			"#qryResp.vcRespText #",
		</cfloop>
	];			

fnCreateSlider('#qryQuestions.idQuestion#','#iSliderAnswer#','#iSliderMin#','#iSliderMax#',steps);
});	
</script>

All of these things together will give a slider of scaled responses. To recap and summarize what we did:

  1. Created a Function to create a slider based on variables passed in
  2. Within a looped query of questions:
    1. Queried for response information
    2. Set variables to necessary values to pass based on response query and any previous data
    3. Passed the variables into a call of our function to create a slider.

Working display example (no form submission or validation):

Demo of jQuery UI Sliders and ColdFusion for Scaled Questions


If you appreciate any of the work that went into making this post, please consider giving a tip to my PayPal account:
https://www.paypal.me/sonkitty

Helpful Inkscape Bookmarks

I have been spending a large portion of my weekend learning how to use Inkscape, a free and open-source vector graphics editor. So, here are some useful bookmarks on some of the lessons learned.

Creating Patterns in Inkscape
Erase / Cut Out From Objects – Inkscape Beginners’ Guide ep25
How to Erase in Inkscape
How to Crop in Inkscape
how to make simple cup in inkscape
[solved] How to select transparent objects?
Inkscape: How to Trace Bitmap
Inkscape: remove stroke preserve size/shape
Inkscape Tutorial: Vector Image Trace
Path Difference Problem – This one is linked specifically to remind me of the following: “First, you must have paths to work with, not objects. Not groups either. Then the path that will be subracted must be on top (in z-order) of the path from which it will be removed (bottom minus top, if you will). Both paths should be selected, of course, before performing the operation.

And when you click difference (or keystroke), look at the status/info area at the bottom of the window. I it will give you some helpful information about what’s happening (or not happening).”

Quick Tip: What are Clipping and Masking in Inkscape?

The result of the weekend’s efforts is my latest T-shirt design:

UPDATE 12/08/2017 1:40PM – I will add new bookmarks as I come across them.

How to Put Text in an Arc Using GIMP

For my recent snowman idea, I was thinking of having the words “Happy Holidays” appear arched over the head. I decided against it in the end, but I learned the process involved in getting it done in GIMP nonetheless, as well as a couple of mistakes to avoid.

1. Use the Path tool.

The other sources I found said to get the path first, but the order doesn’t matter so much as making sure you have the right path or layer highlighted for what you’re doing. In any case, that’s where we’ll start for our example.

The path tool:

2. Make the arc.

For the purpose of our example, click on the left lower end of where you want the arc to start and then click on the right lower end of where you want the arc to end. You should have a straight line, or at least straight-ish. Then place the mouse at the middle of where the arc is going to rise. Click and drag the path upward. We now have an arc. You can fiddle with it more in other ways if it’s not quite what you want.


3. Make the text path.

Now that we have our path, I suggest naming it. I named mine, “ArcExample.” Make sure this path stays or is selected in the paths dialog for this next part. Add the desired text and keep it as a separate text layer. Right-click the text layer and select, “Text along path”. Alternatively, you can highlight the text, right-click it there, and pick “Text along path.”

Warning: Don’t make the text too big.

I kept having this problem in my own process and eventually realized it was because the font I chose was too big so take note to avoid that.


When you do have the text at a suitable size, a new path outlining the full text on the arc we made earlier appears.


4. Select the text path.

Go to the paths dialog, find the one just created, name it if desired, and right-click, then pick Path to Selection.


5. Fill the text color.

Fill it up with the desired color.


DONE!

Deselect, hide path, and it’s done:

Sources:
VisiHow: Write Text in an Arc in the GIMP App
Techwalla: How to Curve Text in GIMP
YouTube: How To Warp Text With GIMP
Superuser.com: Change style and color of text with text along path (gimp)

How to Reduce Noise in Audacity

How to Reduce Noise in Audacity

The below post was originally written in January 2013 for my Tumblr and has been copied and back-dated here to match that.

Yesterday, I worked on a video talking about the video games I played in 2012. While doing my voice recordings, I seemed to be picking up more static noise than usual. Maybe I did the last time I did a recording too and was simply used to it. It had been months since my TTT2 review.

In any case, it bothered me enough to see if there was something I could do about it, and there was.

Here’s how, as noted on the Audacity wiki:

-Find a portion of the recording that is ONLY the noise you want to remove. I usually have a few seconds of lead-in and lead-out time when I make my recordings, so that part’s simple enough.

-Go to Effect -> Noise Removal and click on the button that says “Get Noise Profile.”

-Now select the portion of audio from which you want to remove that noise. For me, that’s the part between my lead-in and lead-out parts.

-Go to Effect -> Noise Removal again but this time check that the “Remove” radio button is selected and then click on the “OK” button.

And there it is. The link above has some more tips to improve it in case you are not satisfied. For me, it was enough for the most part. It sounded just fine from my laptop’s speaker and only had a hint of static with my speaking when I was wearing headphones. Nobody commented on it being an issue on the video. I have a few views and a couple of likes so can only assume it’s either not a problem or not a big, noticeable problem.

UPDATE January 2018: The “Audacity wiki” text originally linked to a specific wiki page. I have removed it because the page is gone and am leaving the original text of my tutorial intact. The last image used in this post shows “Remove” selected, but as of this typing, the menus look a little different and instead use the wording “Reduce.”