How to Use Row_Number in SQL Server

This function is extremely useful. As of late, I use it mainly to help me manage a loop within a loop, which we will save for another time because I need to release said recent work to other users who are not me. However, I want to document this information somewhere for quick and easy reference of my own.

Here is a scenario. I want to create a temporary table of records, and I need to iterate through each row, and I need to a do it in a specific order. I need the row number to act like a record number for just this temporary table, like so:

Declare @tblExample table (idRecord int, idLocation int, dtDate datetime)

Insert into @tblExample

Select Row_Number() Over (order by dtDate) as idRecord, idLocation, dtDate
From tblTask a
	join tblLocation b
		on a.idLocation = b.idLocation
Where 1 = 1
and dtDate >= getdate()

Sometimes I end up removing items from a temporary table and need to reset the idRecord column so that it updates to new row numbers. I can do that with the following code:

Here is how to do that:

Update a
Set idRecord = a.idRecordNew
From
	(
		Select Row_Number() Over (Order by idRecord, idLocation, dtDate) as idRecordNew
		From @tblExample
	) a

That is all for this post.

Creating a Table to Hold Dates for a Year in SQL Server and Maintaining That Table

The scenario:
We want a table that is a list of dates. We really only need the dates between today and one year from today at most, not much more and not much less.

So first, we are going take the current date (@CurrentDate), calculate up to the date we want (one year from today plus one more day so that our table will start at 5/16/2018 and end at 5/16/2019, naming it @YearLaterDate). Because of leap years, the difference might be 367 instead of 366, so we are going to make a variable (@DaysDiff) to help us know that. Once we have that difference, we can loop through up to that number and then insert into our example table.

Declare @CurrentDate date
Declare @YearLaterDate date
Declare @DaysDiff int
Declare @DayCounter int
Create Table tblDateExample (dtDate date)
Set @CurrentDate = getdate()
Set @YearLaterDate = DateAdd(year,1,@CurrentDate)
Set @YearLaterDate = DateAdd(day,1,@YearLaterDate)
Set @DaysDiff = DateDiff(day,@CurrentDate,@YearLaterDate)
Set @Daycounter = 0

while @DayCounter < @DaysDiff
begin
	Insert into tblDateExample
	(dtDate)
	VALUES
	(DateAdd(day,@DayCounter,@CurrentDate))
	Set @DayCounter = @DayCounter + 1
end

Select *
From tblDateExample
Where 1 = 1

Hurray! We've made our table! But wait. Once tomorrow comes along, we will not need 5/16/2018 anymore and will want to add in 5/17/2018. Use whatever means you have for a scheduled task and run the following query once a day. We are going to use many similar variables because we have similar uses. We know we want the table for, from today, to a year from today plus one more day, so use those same ones again. Instead of the difference between those though, we are going to get the maximum date in our example table. Why? To handle for mishaps where we might need to add two days, or thirty days, instead of one. So, now we get the difference between our current maximum and our desired maximum, loop through that difference instead and add any days accordingly. We'll make a quick delete of anything before the day before the current date as well and anything after in case extra dates were added somehow.

Our maintaining query:

Declare @CurrentDate date
Declare @YearLaterDate date
Declare @DayCounter int
Declare @CurrentMax date
Declare @MaxDiff int	
Set @CurrentDate = getdate()
Set @YearLaterDate = DateAdd(year,1,@CurrentDate)
Set @YearLaterDate = DateAdd(day,1,@YearLaterDate)
Set @DayCounter = 0
Set @CurrentMax = (select max(dtDate) from tblDateExample)
Set @MaxDiff = DateDiff(day,@CurrentMax,@YearLaterDate)	
	
delete from tblDateExample where dtDate < @CurrentDate;
delete from tblDateExample where dtDate > @YearLaterDate;

while @DayCounter < @MaxDiff
begin
	Update  tblDateExample
	Set dtDate = dtDate
	Where dtDate = DateAdd(day,@DayCounter,@CurrentMax)
		
	if @@rowcount = 0
	begin
	Insert into  tblDateExample
	(dtDate)
	VALUES
	(DateAdd(day,@DayCounter,@CurrentMax))	
	end
	Set @DayCounter = @DayCounter + 1
end

Now we have a table that keeps the dates for roughly up to a year from the current date to a year from that.

Using SQL to Determine the Sunday and Saturday of the Calendar Week Based on a Given Date

Recently at work, a manager asked that I show some records but restrict them based on the calendar Sunday through Saturday week of a given date.

I did my usual Google search for this particular request, which gave me some ideas though none really gave exactly what I wanted because for some reason, Sundays throw certain expected calculations off.

With that in mind, I decided to write some extra lines just to make it more clear to me what I was accomplishing to get the dates and figured it might be useful to other visitors to this blog.

So, here it is, this is written specifically for SQL Server 2008.

Declare @DateToCheck datetime
Declare @SubtractForSunday int
Declare @AddForSaturday int
Declare @SundayDate datetime
Declare @SaturdayDate datetime
Set @DateToCheck =  DATEADD(d, 0, DATEDIFF(d, 0, GETDATE()))
Set @SubtractForSunday = DATEPART(dw,@DateToCheck) - 1
Set @AddForSaturday = 7 - DATEPART(dw,@DateToCheck)
Set @SundayDate = DateAdd(day,-@SubtractForSunday,@DateToCheck)
Set @SaturdayDate = DateAdd(day,@AddForSaturday,@DateToCheck)	

Select idThing
From tblThing
Where 1 = 1
and dtSomeDate between @SundayDate and @SaturdayDate

To break it down a little so you know what I am doing:

The DATEADD(d, 0, DATEDIFF(d, 0, GETDATE())) portion is to set the current date/time to midnight. You can get around this by making the @DateToCheck variable a date variable, instead of datetime, or making sure the datetime variables you are working with already set to midnight, which was the case for my own particular situation. I’m showing the midnight here because that is not always the case and is useful for my own reference.

Sunday is always day 1 and Saturday is always day 7. Those are known quantities. Once we have a date to check, we can get that date’s day of the week number that is 1 through 7 using algebra. If the day we are checking is 1 (Sunday) and we are aiming to get to 1 (Sunday) , we will want to subtract nothing, 1 – 0 = 1. If the day is 2 (Monday), we will want to subtract only 1, so 2 – 1 = 1. If the day is Saturday we will want that number to be 6, 7 – 6 = 1. We are starting to see a pattern where y is the day of the week are checking and x is the number that will give us the necessary subtraction for reaching 1: yx = 1. We take that same logic to give us Saturday: v + w = 7. The @SubtractForSunday variable is determined by re-working this equation to look like x = y – 1 and the @AddForSaturday variable is determined by re-working it to w = 7 – v.

Because once we have that number, we can proceed to the original form of the equation and use the DateAdd function, making sure to have our minus sign in front of our @SubtractForSunday variable.

If you wanted to condense it instead of lay out all like that, you could do:

Set @SundayDate = DateAdd(day,-(DATEPART(dw,@DateToCheck) - 1),@DateToCheck)
Set @SaturdayDate = DateAdd(day,(7 - DATEPART(dw,@DateToCheck)),@DateToCheck)	

If you appreciate any of the work that went into making this post, please consider giving a tip to my PayPal account:
https://www.paypal.me/sonkitty

How to Use jQuery UI Sliders and ColdFusion for Scaled Questions

This tutorial will assume that you know what jQuery and jQuery UI are and you know how to get them. We will be using a little bit of ColdFusion as well, so if necessary, apply any other programming language to query, loop, and output data. By scaled questions, I mean, “On a scale of 1 to 5, how much do you agree with the following?” The scale numbers can change, but that is my meaning. My current work in mystery shop and online survey questionnaires involves a lot of these.

Here is the function we will be working with:

<script>
var fnCreateSlider = function(idQuestion,iSliderAnswer,iMin,iMax,steps) {
	var handle = $("#handle-value-" + idQuestion + "");
	var SliderTextObj = $("#slider-text-" + idQuestion + "");
	var SliderValueObj = $("#slider-value-" + idQuestion + "");

	$("#slider-" + idQuestion + "").slider({

		value: SliderAnswer,
		min: iMin,
		max: iMax,
		range: "min",
		create: function() {
			var iSliderVal = $(this).slider("value"); 				
			handle.text(iSliderVal);
			SliderTextObj.text(steps[iSliderVal]);
			SliderValueObj.val(iSliderVal);
		},
		slide: function(event, ui) {
			handle.text(ui.value);
			SliderTextObj.text(steps[ui.value]);
			SliderValueObj.val(ui.value);
		}
	});
}
</script>

We will have multiple questions so that is why we have question ID numbers being passed. The iSliderAnswer will tell us where already existing answers will go. The iMin and iMax variables help us track minimum and maximum variables. As for steps, let’s go over that now.

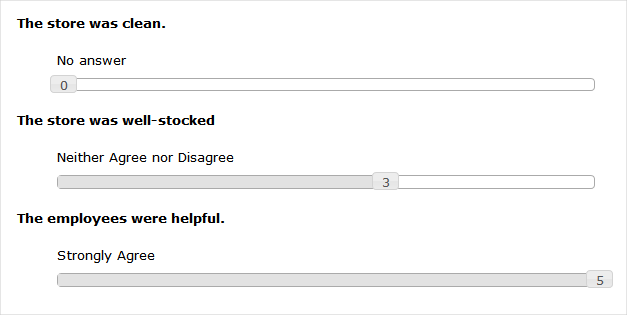
The scale is not going to be only numbers of, for example, 1 through 5. Each response has actual text to represent what it means, such as:
1 – Strongly Disagree
2 – Disagree
3 – Neither Agree nor Disagree
4 – Agree
5 – Strongly Agree

The “steps” variable is an array of our text responses that will be displayed for each value on the scale. We need to both get and pass that information.

So, on some place before or after the script, here’s our query.

<cfquery name=” qryResp” datasource=”master”>
Select iNumber, vcRespValue, vcRespText, fDisplayOrder
From tblResponse
Where idQuestion = <cfqueryPARAM value="#qryQuestions.idQuestion#" cfsqltype="CF_SQL_INTEGER">
Order by fDisplayOrder
</cfquery>

We still have a lot to take care of before we actually call the fnCreateSlider function.

Query to see if a matching answer already exists. Users page through our questionnaires and have the ability to go back if necessary. Handle that process elsewhere according to the needs of your project and/or application.

<cfquery name=”qryRespMatch” datasource=”master”>
Select iNumber, vcRespValue, vcRespText, fDisplayOrder
From tblResponse
Where idQuestion = <cfqueryPARAM value="#qryQuestions.idQuestion#" cfsqltype="CF_SQL_INTEGER">
and vcRespValue = <cfqueryPARAM value="#PrevAnswer#" cfsqltype="CF_SQL_VARCHAR">
order by fDisplayOrder
</cfquery>

Let’s initialize some parameters for our minimum and maximum.

<cfset iSliderMin = 1>
<cfset iSliderMax = 1>

Now let’s get the real minimum and maximum

<cfloop query="qryResp">
	
<cfif qryResp.iNumber lt iSliderMin >
	<cfset iSliderMin = qryResp.iChoiceNumber>
</cfif>
	
<cfif qryResp.iNumber gt iSliderMax>
	<cfset iSliderMax = qryResp.iChoiceNumber>
</cfif>	
	
</cfloop>

Due to the nature of a slider, we don’t really have a null or blank value. That can be a problem for recognizing an unanswered question. If the default value is 1, which is currently “Strongly Disagree” we want to make sure it is because the user wanted it to be 1 as their answer, not because they forgot or tried to skip a required question.

With no blank option, we can put whatever number we want that isn’t on the real scale we are measuring as the default answer. So my approach to that was to drop the real minimum by 1.

<cfset iSliderMin = iSliderMin – 1>

This tutorial is focused on showing you how to get the sliders to display and work though I felt acknowledging a lack of blank answer important enough to note since I didn’t see it mentioned in my searches for how to handle for it. You can use my post on Passing Form Data from a jQuery Ajax Call to a CFC Function and Returning It to learn about passing form data., which is extremely useful for validating it client-side and before the form is submitted and data saved. In the CFC itself, you’d look up the questions minimum/maximum options, see if the chosen value is between them and if not, send back a message to the user saying they have to pick between x and y (1 and 5 in our case). I have the numbers show on the actual slider itself to make it clear what the user is selecting. Enough about validation, let’s move on.

Our query for responses is actually happening within a query outputting question data. It looks something like this:

<cfquery name="qryQuestions" datasource="master">
Select idQuestion, vcQuestionText, vcFieldName
From tblQuestion
</cfquery>

<cfoutput>
<cfloop query="qryQuestions">
	[response queries are in here]
	[slider div displays in here too]
</cfloop>
</cfoutput>

We have two divs, one for displaying the response text and the other for the actual slider. Additionally, we will have a hidden input value to store the response being entered, which will be useful for tracking previous answers and for validating the value. Here is the HTML and ColdFusion for that:

<div id="slider-text-#qryQuestions.idQuestion#" class="slider-text">
	<cfif qryResp.recordcount>
		#qryResp.vcChoiceText#
	<cfelse>
		No answer
	</cfif>										
</div>

<div id="slider-#qryQuestions.idQuestion #" class="div-slider">
	<div id="handle-value-#qryQuestions.idQuestion #" class="ui-slider-handle"></div>
</div>

<input type="hidden" id="slider-value-#qryQuestions.idQuestion#" name="#qryQuestions.vcFieldName#" value=”#PrevAnswer#”>

<cfset iSliderAnswer = PrevAnswer>

At long last, we create our steps array and call our function. I put “No answer” as the first text response on the scale, as noted earlier to be a value that is not the real scale being measured. Again, I want to make sure our users have to pick something between 1 and 5. In this particular example, the questions always start at 1, so our replacement for a blank answer will be 0. I’m not hard-coding them because in my experience, sometimes the scale starts at 0 instead of 1, and I want it to be available for the day when it starts at some other number too.

<script>
$(function() {
	var steps = [
		"No answer",
		<cfloop query="qryResp">
			"#qryResp.vcRespText #",
		</cfloop>
	];			

fnCreateSlider('#qryQuestions.idQuestion#','#iSliderAnswer#','#iSliderMin#','#iSliderMax#',steps);
});	
</script>

All of these things together will give a slider of scaled responses. To recap and summarize what we did:

  1. Created a Function to create a slider based on variables passed in
  2. Within a looped query of questions:
    1. Queried for response information
    2. Set variables to necessary values to pass based on response query and any previous data
    3. Passed the variables into a call of our function to create a slider.

Working display example (no form submission or validation):

Demo of jQuery UI Sliders and ColdFusion for Scaled Questions


If you appreciate any of the work that went into making this post, please consider giving a tip to my PayPal account:
https://www.paypal.me/sonkitty

Break a List Down into Smaller Lists in ColdFusion

The task at hand is to take a list of 50 emails and separate them into batches of 10.

First, I’m going to make a pretend list so as not to use anyone’s real email addresses:

<cfset EmailList = "">
<cfloop from="1" to="50" index="i">
	<cfset EmailList = ListAppend(EmailList,"sample#NumberFormat(i,"00")#@email.com")>
</cfloop>

The list turns out to be:

sample01@email.com,sample02@email.com,sample03@email.com,sample04@email.com,sample05@email.com,sample06@email.com,sample07@email.com,sample08@email.com,sample09@email.com,sample10@email.com,sample11@email.com,sample12@email.com,sample13@email.com,sample14@email.com,sample15@email.com,sample16@email.com,sample17@email.com,sample18@email.com,sample19@email.com,sample20@email.com,sample21@email.com,sample22@email.com,sample23@email.com,sample24@email.com,sample25@email.com,sample26@email.com,sample27@email.com,sample28@email.com,sample29@email.com,sample30@email.com,sample31@email.com,sample32@email.com,sample33@email.com,sample34@email.com,sample35@email.com,sample36@email.com,sample37@email.com,sample38@email.com,sample39@email.com,sample40@email.com,sample41@email.com,sample42@email.com,sample43@email.com,sample44@email.com,sample45@email.com,sample46@email.com,sample47@email.com,sample48@email.com,sample49@email.com,sample50@email.com

Now then, let’s put our list an array because this post on StackOverflow suggests to do so in case of performance issues. Then we’ll loop through it, note our index and length to help us compile a given smaller list, a batch. Here is the exampe code with documentation:

<!--- Put list in an array. --->
<cfset BatchArray = ListToArray(EmailList)/>

<!--- Initialize current batch--->
<cfset CurrentBatch = "">	

<!--- Note full email list length. --->
<cfset ELLen = ListLen(EmailList)>

<!--- Loop up to length of the list.--->
<cfloop from="1" to="#ListLen(EmailList)#" index="idx">
	
	<!--- Check the list length of the current batch to be less than 10 and that the index is not on the length of the entire list. --->
	<cfif ListLen(CurrentBatch) lt 10 and idx neq ELLen>
		
		<!--- Append current email to current batch. --->
		<cfset CurrentBatch = ListAppend(CurrentBatch,BatchArray[idx])>
	
	<!--- Check if the length of the current batch is 10 or the length of the entire list. --->
	<cfelseif ListLen(CurrentBatch) eq 10 OR idx eq ELLen>
		
		<!--- Check if the index is the same as the list length. Append item. --->
		<cfif idx eq ELLen>		
			<cfset CurrentBatch = ListAppend(CurrentBatch,BatchArray[idx])>
		</cfif>		

		<!--- 
		Do what you want with the desired batch, such as storing it in a table.
		For the purposes of this example, we are simply going to output it. 
		--->
		<cfoutput>#CurrentBatch#</cfoutput><br/>
		<br/>

		<!--- Reset the batch for the next one --->
		<cfset CurrentBatch = "">
		
		<!--- 
		Add first item to the reset list. The last item in the full list
		will go here but not matter since our action is done above.  
		--->
		<cfset CurrentBatch = ListAppend(CurrentBatch,BatchArray[idx])>

	</cfif>
	
</cfloop>

Our output looks like this to show we got the list how we want it:
sample01@email.com,sample02@email.com,sample03@email.com,sample04@email.com,sample05@email.com,sample06@email.com,sample07@email.com,sample08@email.com,sample09@email.com,sample10@email.com

sample11@email.com,sample12@email.com,sample13@email.com,sample14@email.com,sample15@email.com,sample16@email.com,sample17@email.com,sample18@email.com,sample19@email.com,sample20@email.com

sample21@email.com,sample22@email.com,sample23@email.com,sample24@email.com,sample25@email.com,sample26@email.com,sample27@email.com,sample28@email.com,sample29@email.com,sample30@email.com

sample31@email.com,sample32@email.com,sample33@email.com,sample34@email.com,sample35@email.com,sample36@email.com,sample37@email.com,sample38@email.com,sample39@email.com,sample40@email.com

sample41@email.com,sample42@email.com,sample43@email.com,sample44@email.com,sample45@email.com,sample46@email.com,sample47@email.com,sample48@email.com,sample49@email.com,sample50@email.com

Passing Form Data from a jQuery Ajax Call to a CFC Function and Returning It

One of the bigger upgrades I did at my job some years ago was to pass form data using jQuery into a CFC, validating it, and then returning any necessary validations or allowing a user to proceed the next step. I used two functions to prepare the data before sending it to a CFC.

Here are the necessary script files:

<script src="https://ajax.googleapis.com/ajax/libs/jquery/3.2.1/jquery.min.js"></script>

json2.js can be downloaded here:
https://github.com/douglascrockford/JSON-js

The two functions:

<script>
	$.fn.serializeObject = function()
	{
	    var o = {};
	    var a = this.serializeArray();
	    $.each(a, function() {
	        if (o[this.name] !== undefined) {
	            if (!o[this.name].push) {
	                o[this.name] = [o[this.name]];
	            }
	            o[this.name].push(this.value || '');
	        } else {
	            o[this.name] = this.value || '';
	        }
	    });
	    return o;
	};
	
	var PrepJSON = function(frmObj) {
		var o = {};
		o = JSON.stringify(frmObj.serializeObject());
		return o;
	};
</script>

The serializeObject function was found here: https://stackoverflow.com/a/5181003 and the JSON stringify part here: https://stackoverflow.com/questions/1184624/convert-form-data-to-javascript-object-with-jquery?page=1&tab=votes#comment4948246_1184624

With those called earlier in an application, we can now tell a submit button to ready our form data before passing it into a CFC using jQuery’s Ajax call.

<script>
$(function() {
	$("#btnSubmit").click(function() {
		//Create variable to store form object
		var frmObj = $("#myForm");

		//Store json string of form data
		var frmData = PrepJSON(frmObj);

		//Call CFC to process the form.
		$.ajax({
			type: 'POST',
			url: "CFCUpdate.cfc?method=ProcessForm"
			,data: ({ frmData: frmData })
			,success: function(data) {
				//Next step goes here.
			  }
			  ,error: function (xhr, textStatus, errorThrown){}	
		});
		return false;
	});
});
</script>

The CFC itself that we are calling:

<cffunction name="ProcessForm" access="remote" output="false" returntype="string" returnformat="plain">

	<cfargument name="frmData" required="yes" type="string">
	<cfset var formStruct = {} />

	<cfset formStruct = DeserializeJSON(arguments.frmData)>

	<!--- Do any necessary processing here--->

	<cfreturn "OK">
</cffunction>

Make sure you have debugging off so that none of it returns through the CFC string. I put something along the lines of the following in any relevant application.cfm or Application.cfc files.

<cfif LCase(Right(script_name,3)) is "cfc">
	<cfsetting showdebugoutput="no">
</cfif>

At a point in time, I thought I might need to return and update the form data as well and encountered a few issues. Since then, I have actually not had a situation where I need to return the entirety of form data and reflect an update, but since I went through the trouble of learning it and logging it at work, I may as well note it on this website as well for any visitors and as possible reference for if I do ever need it after all.

Get the jQuery Field plugin here: https://pengoworks.com/workshop/jquery/field/field.plugin.htm

Here, you’ll see a few changes from our function earlier that I will highlight:

$(function() {
	$("#btnSubmit").click(function() {
		//Create variable to store form object
		var frmObj = $("#myForm");

		//Store json string of form data
		var frmData = PrepJSON(frmObj);

		//Call CFC to process the form.
		$.ajax({
			type: 'POST',
			url: "CFCUpdate.cfc?method=ProcessFormv1
			,data: ({ frmData: frmData })
			,dataType: "json"
			,success: function(data) {
				frmObj.formHash(data);
			  }
			  ,error: function (xhr, textStatus, errorThrown){}	
		});

		return false;
	});
});

This is the function in our CFC where we will update at least one form value. I am changing the return type and return format from “plain” to “json” to demonstrate a point.

<cffunction name="ProcessFormv1" access="remote" output="false" returnType="struct" returnFormat="json">
	<cfargument name="frmData" required="yes" type="string">
	<cfset var formStruct = {} />

	<cfset formStruct = DeserializeJSON(arguments.frmData)>

	<cfset formStruct.myField1 = "I've been updated!">

	<cfreturn formStruct>
</cffunction>

I do not have ColdFusion for my portfolio web space, so you’re going to have to take my word for the following. The above has a problem. In CF8, it would eliminate leading zeroes from a text input. That seems to be resolved in CF10, but another problem remains. If you put in a considerably long number, such as 1245678901234567890123, when the application puts the form data back, that number would look like 1.245678901234568e+21, and we don’t want that!

The solution I found was the JSONUtil project: http://jsonutil.riaforge.org/. I downloaded the project and put the two CFCs into my CFC directory. With that done, here is an updated function:

<cffunction name="ProcessFormv2" access="remote" output="false" returnType="string" returnFormat="plain">
	<cfargument name="frmData" required="yes" type="string">
	<cfset var formStruct = {} />

	<cfset formStruct = DeserializeJSON(arguments.frmData)>									
	
	<cfset formStruct.myField1 = "I've been updated!">
	
	<cfset JUtil = CreateObject('component','JSONUtil')>
	<cfset formString = JUtil.serializeToJSON(formStruct,"false","true")>			

	<cfreturn formString>
</cffunction>

Other issues that one may encounter though I could not reproduce them at a later point is date formats returning with “\/” as in 11\/\08\/2017 instead of 11/08/2017. You can add the following under the assumption you would never need \/ in a string:

<cfset formString = Replace(formString,"\/","/","ALL")>

If you see a debugging message that says something like “Cannot use ‘in’ operator to…”, this might solve your problem. It happened within the jQueryField plugin.

Find this piece of code in jquery.field.js:

// if we're setting values, set them now
} else if( n in map ){

Change it to:

// if we're setting values, set them now
} else if (map.hasOwnProperty(n)) {

I used that as my solution based on what I found here: Javascript’s hasOwnProperty() Method Is More Consistent Than The IN Operator.

All of these items together allow us to pass form data back and forth as needed and is especially helpful with web application development, such as allowing validation before a form is submitted.

If you appreciate any of the work that went into making this post, please consider giving a tip to my PayPal account or supporting me on Patreon.

Using the DataTables Plugin

My work involves showing many tables, so I use a jQuery plugin called DataTables quite a bit. For the example I want to show you, we need jQuery, jQuery UI, DataTables, and the Buttons extension for DataTables. Additionally, I will share standard custom styling I’ve done in CSS.

These are the scripts and CSS files we will be using for reference that are NOT my customization. Most links were found using the download tools on the DataTables website. The jQuery smoothness CSS file is from the Google Hosted Libraries.

<link rel="stylesheet" type="text/css" href="https://cdn.datatables.net/buttons/1.4.2/css/buttons.dataTables.min.css"/t>
<link rel="stylesheet" href="http://ajax.googleapis.com/ajax/libs/jqueryui/1.8.6/themes/smoothness/jquery-ui.css" type="text/css" media="all" /t>
<link rel="stylesheet" href="https://cdn.datatables.net/1.10.16/css/dataTables.jqueryui.min.css" type="text/css" media="all" /t>
<script src="//code.jquery.com/jquery-1.12.4.js"></script>
<script type="text/javascript" src="https://cdnjs.cloudflare.com/ajax/libs/jszip/2.5.0/jszip.min.js"></script>
<script type="text/javascript" src="https://cdnjs.cloudflare.com/ajax/libs/pdfmake/0.1.32/vfs_fonts.js"></script>
<script type="text/javascript" src="https://cdnjs.cloudflare.com/ajax/libs/pdfmake/0.1.32/pdfmake.min.js"></script>
<script src="https://cdn.datatables.net/1.10.16/js/jquery.dataTables.min.js"></script>
<script src="https://cdn.datatables.net/1.10.16/js/dataTables.jqueryui.min.js"></script>
<script type="text/javascript" src="https://cdn.datatables.net/buttons/1.4.2/js/dataTables.buttons.min.js"></script>
<script type="text/javascript" src="https://cdn.datatables.net/buttons/1.4.2/js/buttons.colVis.min.js"></script>
<script type="text/javascript" src="https://cdn.datatables.net/buttons/1.4.2/js/buttons.flash.min.js"></script>
<script type="text/javascript" src="https://cdn.datatables.net/buttons/1.4.2/js/buttons.html5.min.js"></script>
<script type="text/javascript" src="https://cdn.datatables.net/buttons/1.4.2/js/buttons.print.min.js"></script>

Now, the script to make the DataTable:

<script>
$(document).ready(function() {
	var table = $('#example').DataTable({
	"bJQueryUI": true,
	"bPaginate": true,
	"aLengthMenu": [[20, 50, -1], [20, 50, "All"]],
	"iDisplayLength": 20,
		buttons: [
    			{
        			extend: 'copyHtml5'
    			},
    			{
        			extend: 'excelHtml5',
        			title: 'VGCharacterst'
    			},
    			{
        			extend: 'pdfHtml5',
        			title: 'VGCharacterst'
    			},
		"print"
		]
	});

table.buttons().container().insertBefore( "#" + TableID + "_filter" );
</script>

The code starting with “var table = $(‘#example’).DataTable({“ is to indicate the example DataTable should use jQuery UI, have pages, show pages of lengths 20, 50, and All with 20 being the default length, and then use the Buttons extension. The code afterwards makes the buttons visible on the page.

Here is what the table looks like with the CSS from my own default work folder pages but not any custom DataTables styling yet:

For the ways my work uses DataTables, that is too much padding because we display more information than that, and it’s harder to separate the rows. I want it to be tighter all-around but not so tight as to have zero padding anywhere.

Here is the CSS that will change the appearance as wanted:

/* Odd stripes (including sort 1 column)*/
.dataTables_wrapper .odd {
	background-color: #fff;	
}

/* Even stripes (including sort 1 column) */
.dataTables_wrapper .even {
	background-color: #f0f0f0;
}

/* Border for table and width */
.dataTables_wrapper table {
	border-spacing: 0;
	border-collapse: collapse;	
	border: 1px solid #afafaf;
	width: 100%;	
}

/* Hover color as a light blue */
.dataTables_wrapper table tbody tr:hover td {
	background: #A4CAEF;
}

/* Show x rows width and float to the left */ 
.dataTables_length {
	width: 35%;
	float: left;
}

/* Show x rows and search box padding and bottom margin */
.dataTables_length, .dataTables_filter {
	padding: 10px 0px 0px 10px;
	margin-bottom: 7px;
}

/* Showing x of x placement (lower left with some padding) */
.dataTables_info, .dataTables_wrapper .dataTables_info {
	width: 45%;
	float: left;
	padding: 5px;	
}

/* Adds some padding to bottom for pagination buttons */
.dataTables_wrapper .ui-buttonset { padding: 10px; }

/* Removes padding on wrapper above/below table */
.dataTables_wrapper .ui-toolbar { padding: 0; }

/* Removes noticeable border for table lacking a footer */ 
table.dataTable.no-footer { border-bottom: 0; }

/* Bolds Show blank entries and showing 1 of x  in wrapper. */
.dataTables_wrapper .ui-widget-header  {
	font-weight: bold;
}

/* Floats the search filter to the left so it's in the middle-ish area instead of too far to the right */
.dataTables_wrapper .dataTables_filter {
	float: left; 
	text-align: left;
}

/* Lowers padding on table header cells  */
table.dataTable thead th {
	padding: 2px 2px 2px 4px;
}

/* Hides the sorting icon */ 
.DataTables_sort_icon { display: none; }

/* Removes bottom border along bottom of a given row, lower padding on table body cells  */
table.dataTable tbody td {
	border: 0;
	padding: 2px 2px 2px 4px;
}

/* Places buttons in upper right with some padding */
div .dt-buttons {
	margin-top: 0;
	margin-left: 10px;
	float: right;
	padding: 10px 2px 10px 4px;	
}

/* Removes spacing between buttons */
div .dt-buttons a { margin-left: -10px; }

Here is the page with the custom styling done and a screenshot below:
http://www.cathygreunkeweb.com/demos/DataTables.php

I eventually created a function upon seeing how frequently my work used DataTables. Sometimes they would be paginated, and sometimes not, and sometimes I wanted a custom filename, but using buttons*, jQuery UI, and having a preferred length were common.

My function, a little modified for the example:

<script>
	var StandardDT = function(TableID,bPaginate,FileName) {
		
		bPaginate = (typeof bPaginate === "undefined") ? true : bPaginate;
		FileName = (typeof FileName === "undefined") ? "" : FileName;
		
		var oTable= $("#" + TableID + "").DataTable({ 
			"bJQueryUI": true,
			"bPaginate": bPaginate,
			"aLengthMenu": [[20, 50, -1], [20, 50, "All"]],
			"iDisplayLength": 20,
		        buttons: [
		            {
	        	        extend: 'copyHtml5'
		            },		
		            {
	        	        extend: 'excelHtml5',
	                	title: 'FileName'
		            },
		            {
	        	        extend: 'pdfHtml5',
	                	title: 'FileName'
		            },
				"print"
	        ]
		});

		oTable.buttons().container().insertBefore( "#" + TableID + "_filter" );
	}
</script>

Then in a script placed after the table is created:

<script>
$(document).ready(function() {
	StandardDT("example",true,"VGCharacters");
});
</script>

*Buttons – Much of my work uses a retired extension called Table Tools that do a similar thing, shows buttons allowing copy/export/print. The code was written some years before the Buttons extension used here existed. In the interest of showing an active extension, I have learned and shown modified work here.

Using a JSON string prepared in ColdFusion for Autocomplete use in jQuery

The below post was originally written in September 2012 for my Tumblr. I still use this set of tools for auto-complete when creating questionnaires for my current employer and later used it for internal  uses to auto-fill entries in some of their tools and one of our clients for an entry form their vendors use.

The goal was to use jQuery UI’s Autocomplete widget and the source for what would fill in such entries was a query result set, namely a list of questions.

The next day, I decided that I wanted Autocomplete restricted to strings that started with what was being entered but to still be case insensitive.

The process went as follows:

-Use AJAX to call a CFC that would query the questions

-Return the list in an acceptable JSON structure for use in Javascript/jQuery.

-Place that array as the source for Autocomplete

-Set up Autocomplete to my specific requirements

Here is our basic ajax call. We make the result a variable since that given result is what we will be passing to Autocomplete.

var arrQst = $ajax({
	url: "path/Filename.cfc?method=GetQuestions"
	,async: false
	,type: 'POST'
}).responseText;

Here is our CFC function:

<cffunction
	name="GetQuestions"
	access="remote"
	returntype="string"
	returnformat="plain"
	output="false"
	hint="I return a list of questions">
	
	<cfquery name="qryQuestions" datasource="master">
		Select Question
		From tblQuestion
	</cfquery>
	
	<cfloop query="qryQuestions">
		<cfset returnStruct = StructNew() />
		<cfset returnStruct["value"] = qryQuestions.qst />
		<cfset ArrayAppend(result,returnStruct)/>
	</cfloop>
	
	<cfreturn serializeJSON(result) />

</cffunction>

The part after the query is the part of interest to us. That is what puts the results into a JSON structure that our jQuery will understand.

Here is our HTML input

<input type="text" name="inputstring" id="inputstring">

Here is our jQuery for Autocomplete:

function split( val ) {
	return val.split( /,\s*/ );
}
function extractLast( term ) {
	return split( term ).pop();
}

$("#inputstring#")
// don't navigate away from the field on tab when selecting an item
.bind( "keydown", function( event ) {
	if ( event.keyCode === $.ui.keyCode.TAB &&
			$( this ).data( "autocomplete" ).menu.active ) {
		event.preventDefault();
	}
}).autocomplete({
	minLength: 1,
	source: function(request,response) {
		var StringList = jQuery.parseJSON(arrQst);
                var matches = $.map( StringList, function(q) {
		//Check this pattern, starts with what is entered, 
                       //case insensitive
		var patt = new RegExp("^" + request.term, "i");
		//variable to hold if pattern matches
		var isMatch = patt.test(q.value);
		
		//if so return the string
		if(isMatch == true) {
			return q;
		}
	});
		response (matches);
	},
	focus: function() {
		// prevent value inserted on focus
		return false;
	},
	select: function(event, ui) {
		var terms = split( this.value );
		// remove the current input
		terms.pop();
		// add the selected item
		terms.push( ui.item.value );
		this.value = terms;
		return false;				   
	}
});

There were some extra steps that I must have researched nearly a year ago with the split and extractLast, from an older project, so I won’t be going over them. Here, the part of interest to us is what’s under source. There, we go over our array, check it against a regular expression to determine if the beginning what is being entered matches the values being checked in the array. We disregard case though. That way, if our user enters “the long…,” it will bring up any string that starts with those letters.

And voila, fantastic Autocomplete functionality, should be quite useful for increased productivity.