Creating a Table to Hold Dates for a Year in SQL Server and Maintaining That Table

The scenario:
We want a table that is a list of dates. We really only need the dates between today and one year from today at most, not much more and not much less.

So first, we are going take the current date (@CurrentDate), calculate up to the date we want (one year from today plus one more day so that our table will start at 5/16/2018 and end at 5/16/2019, naming it @YearLaterDate). Because of leap years, the difference might be 367 instead of 366, so we are going to make a variable (@DaysDiff) to help us know that. Once we have that difference, we can loop through up to that number and then insert into our example table.

Declare @CurrentDate date
Declare @YearLaterDate date
Declare @DaysDiff int
Declare @DayCounter int
Create Table tblDateExample (dtDate date)
Set @CurrentDate = getdate()
Set @YearLaterDate = DateAdd(year,1,@CurrentDate)
Set @YearLaterDate = DateAdd(day,1,@YearLaterDate)
Set @DaysDiff = DateDiff(day,@CurrentDate,@YearLaterDate)
Set @Daycounter = 0

while @DayCounter < @DaysDiff
begin
	Insert into tblDateExample
	(dtDate)
	VALUES
	(DateAdd(day,@DayCounter,@CurrentDate))
	Set @DayCounter = @DayCounter + 1
end

Select *
From tblDateExample
Where 1 = 1

Hurray! We've made our table! But wait. Once tomorrow comes along, we will not need 5/16/2018 anymore and will want to add in 5/17/2018. Use whatever means you have for a scheduled task and run the following query once a day. We are going to use many similar variables because we have similar uses. We know we want the table for, from today, to a year from today plus one more day, so use those same ones again. Instead of the difference between those though, we are going to get the maximum date in our example table. Why? To handle for mishaps where we might need to add two days, or thirty days, instead of one. So, now we get the difference between our current maximum and our desired maximum, loop through that difference instead and add any days accordingly. We'll make a quick delete of anything before the day before the current date as well and anything after in case extra dates were added somehow.

Our maintaining query:

Declare @CurrentDate date
Declare @YearLaterDate date
Declare @DayCounter int
Declare @CurrentMax date
Declare @MaxDiff int	
Set @CurrentDate = getdate()
Set @YearLaterDate = DateAdd(year,1,@CurrentDate)
Set @YearLaterDate = DateAdd(day,1,@YearLaterDate)
Set @DayCounter = 0
Set @CurrentMax = (select max(dtDate) from tblDateExample)
Set @MaxDiff = DateDiff(day,@CurrentMax,@YearLaterDate)	
	
delete from tblDateExample where dtDate < @CurrentDate;
delete from tblDateExample where dtDate > @YearLaterDate;

while @DayCounter < @MaxDiff
begin
	Update  tblDateExample
	Set dtDate = dtDate
	Where dtDate = DateAdd(day,@DayCounter,@CurrentMax)
		
	if @@rowcount = 0
	begin
	Insert into  tblDateExample
	(dtDate)
	VALUES
	(DateAdd(day,@DayCounter,@CurrentMax))	
	end
	Set @DayCounter = @DayCounter + 1
end

Now we have a table that keeps the dates for roughly up to a year from the current date to a year from that.

Using SQL to Determine the Sunday and Saturday of the Calendar Week Based on a Given Date

Recently at work, a manager asked that I show some records but restrict them based on the calendar Sunday through Saturday week of a given date.

I did my usual Google search for this particular request, which gave me some ideas though none really gave exactly what I wanted because for some reason, Sundays throw certain expected calculations off.

With that in mind, I decided to write some extra lines just to make it more clear to me what I was accomplishing to get the dates and figured it might be useful to other visitors to this blog.

So, here it is, this is written specifically for SQL Server 2008.

Declare @DateToCheck datetime
Declare @SubtractForSunday int
Declare @AddForSaturday int
Declare @SundayDate datetime
Declare @SaturdayDate datetime
Set @DateToCheck =  DATEADD(d, 0, DATEDIFF(d, 0, GETDATE()))
Set @SubtractForSunday = DATEPART(dw,@DateToCheck) - 1
Set @AddForSaturday = 7 - DATEPART(dw,@DateToCheck)
Set @SundayDate = DateAdd(day,-@SubtractForSunday,@DateToCheck)
Set @SaturdayDate = DateAdd(day,@AddForSaturday,@DateToCheck)	

Select idThing
From tblThing
Where 1 = 1
and dtSomeDate between @SundayDate and @SaturdayDate

To break it down a little so you know what I am doing:

The DATEADD(d, 0, DATEDIFF(d, 0, GETDATE())) portion is to set the current date/time to midnight. You can get around this by making the @DateToCheck variable a date variable, instead of datetime, or making sure the datetime variables you are working with already set to midnight, which was the case for my own particular situation. I’m showing the midnight here because that is not always the case and is useful for my own reference.

Sunday is always day 1 and Saturday is always day 7. Those are known quantities. Once we have a date to check, we can get that date’s day of the week number that is 1 through 7 using algebra. If the day we are checking is 1 (Sunday) and we are aiming to get to 1 (Sunday) , we will want to subtract nothing, 1 – 0 = 1. If the day is 2 (Monday), we will want to subtract only 1, so 2 – 1 = 1. If the day is Saturday we will want that number to be 6, 7 – 6 = 1. We are starting to see a pattern where y is the day of the week are checking and x is the number that will give us the necessary subtraction for reaching 1: yx = 1. We take that same logic to give us Saturday: v + w = 7. The @SubtractForSunday variable is determined by re-working this equation to look like x = y – 1 and the @AddForSaturday variable is determined by re-working it to w = 7 – v.

Because once we have that number, we can proceed to the original form of the equation and use the DateAdd function, making sure to have our minus sign in front of our @SubtractForSunday variable.

If you wanted to condense it instead of lay out all like that, you could do:

Set @SundayDate = DateAdd(day,-(DATEPART(dw,@DateToCheck) - 1),@DateToCheck)
Set @SaturdayDate = DateAdd(day,(7 - DATEPART(dw,@DateToCheck)),@DateToCheck)	

If you appreciate any of the work that went into making this post, please consider giving a tip to my PayPal account:
https://www.paypal.me/sonkitty

Using the DataTables Plugin

My work involves showing many tables, so I use a jQuery plugin called DataTables quite a bit. For the example I want to show you, we need jQuery, jQuery UI, DataTables, and the Buttons extension for DataTables. Additionally, I will share standard custom styling I’ve done in CSS.

These are the scripts and CSS files we will be using for reference that are NOT my customization. Most links were found using the download tools on the DataTables website. The jQuery smoothness CSS file is from the Google Hosted Libraries.

<link rel="stylesheet" type="text/css" href="https://cdn.datatables.net/buttons/1.4.2/css/buttons.dataTables.min.css"/t>
<link rel="stylesheet" href="http://ajax.googleapis.com/ajax/libs/jqueryui/1.8.6/themes/smoothness/jquery-ui.css" type="text/css" media="all" /t>
<link rel="stylesheet" href="https://cdn.datatables.net/1.10.16/css/dataTables.jqueryui.min.css" type="text/css" media="all" /t>
<script src="//code.jquery.com/jquery-1.12.4.js"></script>
<script type="text/javascript" src="https://cdnjs.cloudflare.com/ajax/libs/jszip/2.5.0/jszip.min.js"></script>
<script type="text/javascript" src="https://cdnjs.cloudflare.com/ajax/libs/pdfmake/0.1.32/vfs_fonts.js"></script>
<script type="text/javascript" src="https://cdnjs.cloudflare.com/ajax/libs/pdfmake/0.1.32/pdfmake.min.js"></script>
<script src="https://cdn.datatables.net/1.10.16/js/jquery.dataTables.min.js"></script>
<script src="https://cdn.datatables.net/1.10.16/js/dataTables.jqueryui.min.js"></script>
<script type="text/javascript" src="https://cdn.datatables.net/buttons/1.4.2/js/dataTables.buttons.min.js"></script>
<script type="text/javascript" src="https://cdn.datatables.net/buttons/1.4.2/js/buttons.colVis.min.js"></script>
<script type="text/javascript" src="https://cdn.datatables.net/buttons/1.4.2/js/buttons.flash.min.js"></script>
<script type="text/javascript" src="https://cdn.datatables.net/buttons/1.4.2/js/buttons.html5.min.js"></script>
<script type="text/javascript" src="https://cdn.datatables.net/buttons/1.4.2/js/buttons.print.min.js"></script>

Now, the script to make the DataTable:

<script>
$(document).ready(function() {
	var table = $('#example').DataTable({
	"bJQueryUI": true,
	"bPaginate": true,
	"aLengthMenu": [[20, 50, -1], [20, 50, "All"]],
	"iDisplayLength": 20,
		buttons: [
    			{
        			extend: 'copyHtml5'
    			},
    			{
        			extend: 'excelHtml5',
        			title: 'VGCharacterst'
    			},
    			{
        			extend: 'pdfHtml5',
        			title: 'VGCharacterst'
    			},
		"print"
		]
	});

table.buttons().container().insertBefore( "#" + TableID + "_filter" );
</script>

The code starting with “var table = $(‘#example’).DataTable({“ is to indicate the example DataTable should use jQuery UI, have pages, show pages of lengths 20, 50, and All with 20 being the default length, and then use the Buttons extension. The code afterwards makes the buttons visible on the page.

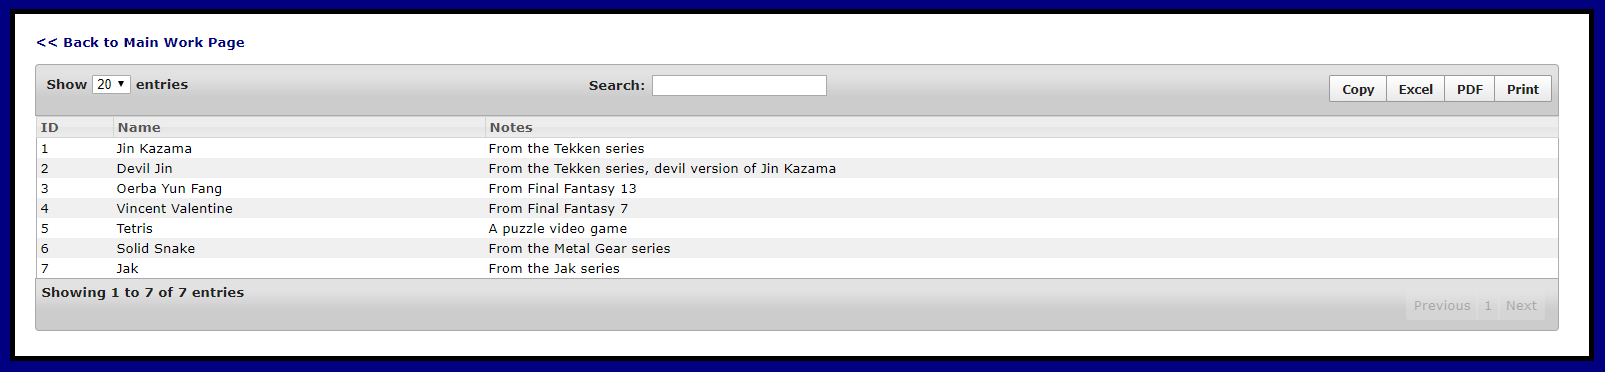
Here is what the table looks like with the CSS from my own default work folder pages but not any custom DataTables styling yet:

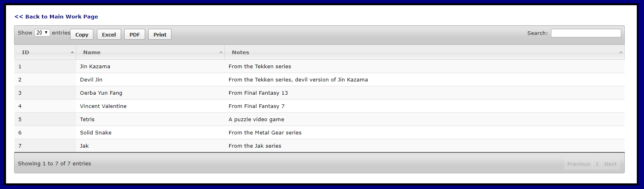
For the ways my work uses DataTables, that is too much padding because we display more information than that, and it’s harder to separate the rows. I want it to be tighter all-around but not so tight as to have zero padding anywhere.

Here is the CSS that will change the appearance as wanted:

/* Odd stripes (including sort 1 column)*/
.dataTables_wrapper .odd {
	background-color: #fff;	
}

/* Even stripes (including sort 1 column) */
.dataTables_wrapper .even {
	background-color: #f0f0f0;
}

/* Border for table and width */
.dataTables_wrapper table {
	border-spacing: 0;
	border-collapse: collapse;	
	border: 1px solid #afafaf;
	width: 100%;	
}

/* Hover color as a light blue */
.dataTables_wrapper table tbody tr:hover td {
	background: #A4CAEF;
}

/* Show x rows width and float to the left */ 
.dataTables_length {
	width: 35%;
	float: left;
}

/* Show x rows and search box padding and bottom margin */
.dataTables_length, .dataTables_filter {
	padding: 10px 0px 0px 10px;
	margin-bottom: 7px;
}

/* Showing x of x placement (lower left with some padding) */
.dataTables_info, .dataTables_wrapper .dataTables_info {
	width: 45%;
	float: left;
	padding: 5px;	
}

/* Adds some padding to bottom for pagination buttons */
.dataTables_wrapper .ui-buttonset { padding: 10px; }

/* Removes padding on wrapper above/below table */
.dataTables_wrapper .ui-toolbar { padding: 0; }

/* Removes noticeable border for table lacking a footer */ 
table.dataTable.no-footer { border-bottom: 0; }

/* Bolds Show blank entries and showing 1 of x  in wrapper. */
.dataTables_wrapper .ui-widget-header  {
	font-weight: bold;
}

/* Floats the search filter to the left so it's in the middle-ish area instead of too far to the right */
.dataTables_wrapper .dataTables_filter {
	float: left; 
	text-align: left;
}

/* Lowers padding on table header cells  */
table.dataTable thead th {
	padding: 2px 2px 2px 4px;
}

/* Hides the sorting icon */ 
.DataTables_sort_icon { display: none; }

/* Removes bottom border along bottom of a given row, lower padding on table body cells  */
table.dataTable tbody td {
	border: 0;
	padding: 2px 2px 2px 4px;
}

/* Places buttons in upper right with some padding */
div .dt-buttons {
	margin-top: 0;
	margin-left: 10px;
	float: right;
	padding: 10px 2px 10px 4px;	
}

/* Removes spacing between buttons */
div .dt-buttons a { margin-left: -10px; }

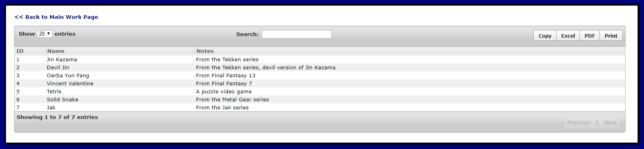
Here is the page with the custom styling done and a screenshot below:
http://www.cathygreunkeweb.com/demos/DataTables.php

I eventually created a function upon seeing how frequently my work used DataTables. Sometimes they would be paginated, and sometimes not, and sometimes I wanted a custom filename, but using buttons*, jQuery UI, and having a preferred length were common.

My function, a little modified for the example:

<script>
	var StandardDT = function(TableID,bPaginate,FileName) {
		
		bPaginate = (typeof bPaginate === "undefined") ? true : bPaginate;
		FileName = (typeof FileName === "undefined") ? "" : FileName;
		
		var oTable= $("#" + TableID + "").DataTable({ 
			"bJQueryUI": true,
			"bPaginate": bPaginate,
			"aLengthMenu": [[20, 50, -1], [20, 50, "All"]],
			"iDisplayLength": 20,
		        buttons: [
		            {
	        	        extend: 'copyHtml5'
		            },		
		            {
	        	        extend: 'excelHtml5',
	                	title: 'FileName'
		            },
		            {
	        	        extend: 'pdfHtml5',
	                	title: 'FileName'
		            },
				"print"
	        ]
		});

		oTable.buttons().container().insertBefore( "#" + TableID + "_filter" );
	}
</script>

Then in a script placed after the table is created:

<script>
$(document).ready(function() {
	StandardDT("example",true,"VGCharacters");
});
</script>

*Buttons – Much of my work uses a retired extension called Table Tools that do a similar thing, shows buttons allowing copy/export/print. The code was written some years before the Buttons extension used here existed. In the interest of showing an active extension, I have learned and shown modified work here.

Using a JSON string prepared in ColdFusion for Autocomplete use in jQuery

The below post was originally written in September 2012 for my Tumblr. I still use this set of tools for auto-complete when creating questionnaires for my current employer and later used it for internal  uses to auto-fill entries in some of their tools and one of our clients for an entry form their vendors use.

The goal was to use jQuery UI’s Autocomplete widget and the source for what would fill in such entries was a query result set, namely a list of questions.

The next day, I decided that I wanted Autocomplete restricted to strings that started with what was being entered but to still be case insensitive.

The process went as follows:

-Use AJAX to call a CFC that would query the questions

-Return the list in an acceptable JSON structure for use in Javascript/jQuery.

-Place that array as the source for Autocomplete

-Set up Autocomplete to my specific requirements

Here is our basic ajax call. We make the result a variable since that given result is what we will be passing to Autocomplete.

var arrQst = $ajax({
	url: "path/Filename.cfc?method=GetQuestions"
	,async: false
	,type: 'POST'
}).responseText;

Here is our CFC function:

<cffunction
	name="GetQuestions"
	access="remote"
	returntype="string"
	returnformat="plain"
	output="false"
	hint="I return a list of questions">
	
	<cfquery name="qryQuestions" datasource="master">
		Select Question
		From tblQuestion
	</cfquery>
	
	<cfloop query="qryQuestions">
		<cfset returnStruct = StructNew() />
		<cfset returnStruct["value"] = qryQuestions.qst />
		<cfset ArrayAppend(result,returnStruct)/>
	</cfloop>
	
	<cfreturn serializeJSON(result) />

</cffunction>

The part after the query is the part of interest to us. That is what puts the results into a JSON structure that our jQuery will understand.

Here is our HTML input

<input type="text" name="inputstring" id="inputstring">

Here is our jQuery for Autocomplete:

function split( val ) {
	return val.split( /,\s*/ );
}
function extractLast( term ) {
	return split( term ).pop();
}

$("#inputstring#")
// don't navigate away from the field on tab when selecting an item
.bind( "keydown", function( event ) {
	if ( event.keyCode === $.ui.keyCode.TAB &&
			$( this ).data( "autocomplete" ).menu.active ) {
		event.preventDefault();
	}
}).autocomplete({
	minLength: 1,
	source: function(request,response) {
		var StringList = jQuery.parseJSON(arrQst);
                var matches = $.map( StringList, function(q) {
		//Check this pattern, starts with what is entered, 
                       //case insensitive
		var patt = new RegExp("^" + request.term, "i");
		//variable to hold if pattern matches
		var isMatch = patt.test(q.value);
		
		//if so return the string
		if(isMatch == true) {
			return q;
		}
	});
		response (matches);
	},
	focus: function() {
		// prevent value inserted on focus
		return false;
	},
	select: function(event, ui) {
		var terms = split( this.value );
		// remove the current input
		terms.pop();
		// add the selected item
		terms.push( ui.item.value );
		this.value = terms;
		return false;				   
	}
});

There were some extra steps that I must have researched nearly a year ago with the split and extractLast, from an older project, so I won’t be going over them. Here, the part of interest to us is what’s under source. There, we go over our array, check it against a regular expression to determine if the beginning what is being entered matches the values being checked in the array. We disregard case though. That way, if our user enters “the long…,” it will bring up any string that starts with those letters.

And voila, fantastic Autocomplete functionality, should be quite useful for increased productivity.